Java SE JDK(Java Development Kit) :java开发工具箱
JRE(Java Runtime Environment):java运行环境
JVM(Java Visula Machine):java虚拟机
java程序员直接编写的java代码(普通文本)是无法被JVM识别的。这种代码必须经过编译,将这个”普通文本”变成”字节码”,JVM能够识别”字节码”,这个过程叫做”编译”。
一个java源文件是可以生成多个class文件的,最终运行的就是class文件。
.java文件就是源文件。
.class文件就是字节码文件。
字节码文件不是二进制文件,字节码文件被JVM解释成计算机能够识别的二进制。
java程序开发到最终运行经历了什么?
编译期:
建立.java源文件。
编译器javac.exe把.java文件编译成.class字节码文件。
运行期(JRE起重要作用):
先启动JVM,然后通过class类加载器把字节码装载到JVM中
然后JVM启动”解释器”对字节码进行解释成计算机能够识别的二进制码。
运行java程序的步骤:
第一步:先使用cd切换到HelloJava.class文件所在的路径,然后进行javac 文件名的方式进行编译,成class文件。然后再进行java 类文件名进行输出。
classpath是一个环境变量,是给类加载器指路的。
public的类可以没有,但是如果有public修饰的类名字,则类名必须与源文件名一致。
基本数据类型转化规则
八种基本数据类型中,除boolean类型不能转化,剩下七种类型之间可以进行相互转化。
如果整数型字面量没有超出byte,short,char的取值范围,也可以直接将其赋值给byte,short,char类型的变量。
小容量向大容量转化称为自动类型转化,容量从小到大排序为:byte<short(char)<int<long<float<double,其中short和char都占用两个字节,但是char可以表示更大的整数。
大容量转化成小容量,称为强制类型转化,编写时必须添加”强制类型转化符”,但运行时精度可能会损失。
byte,short,char类型混合运算的时候,先各自转化成int类型再做运算。多种数据类型混合运算的时候,各自先转成容量最大的一种然后再做运算。
&&和||称为短路与和短路或,使用短路可提升效率,因为在进行逻辑与判断的时候,只要前面为false则后面的将不进行计算。
方法 方法就像js中的函数。用来实现功能。
方法重载:方法名相同,参数列表不同。
方法的返回值类型 :
java中方法就是为了完成某个特定的功能,方法结束之后,大部分都会有一个结果的,而体现结果的一般都是数据。数据得有类型。这就是返回值类型。
当一个方法执行结束不返回任何值的时候,返回值类型也不能空白,必须写上void关键字。所以void表示该方法执行结束后不返回任何结果。
方法执行结束之后的返回值实际上是给调用者了。
如果返回值类型不是void,那么你在方法体执行结束的时候必须使用return值;否则的话就会报错。
方法的调用 :
使用类名.方法的方式进行调用。
return跟break的区别:return直接终止方法,break终止循环。
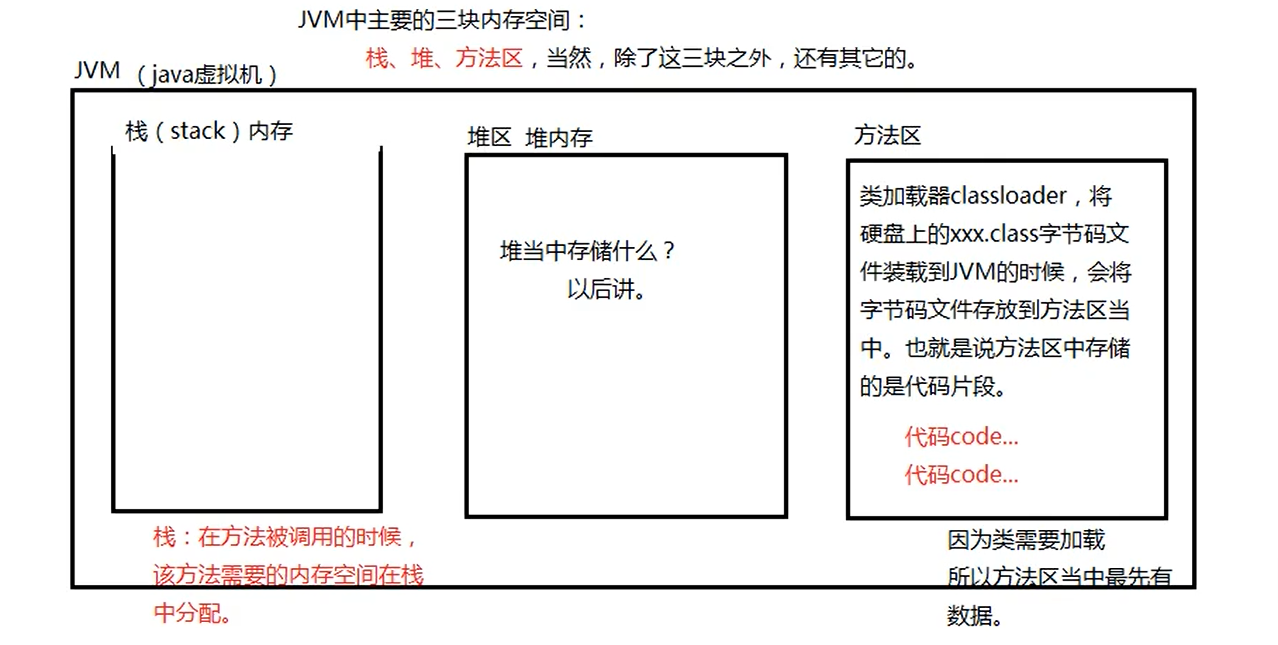
JVM内存结构 :
JVM三块主要内存:栈内存、堆内存、方法区内存。
方法区最先有数据:方法区中放代码片段,存放class字节码。
栈内存:方法调用的时候,会在栈中开辟内存空间。
方法调用才会在栈开辟空间,并且调用时就是压栈 ,方法执行完之后,就会销毁空间,简称弹栈 。
对象
java中所有的类都是引用数据类型,String是已经在底层写好的类供我们使用。
创建对象的方式:
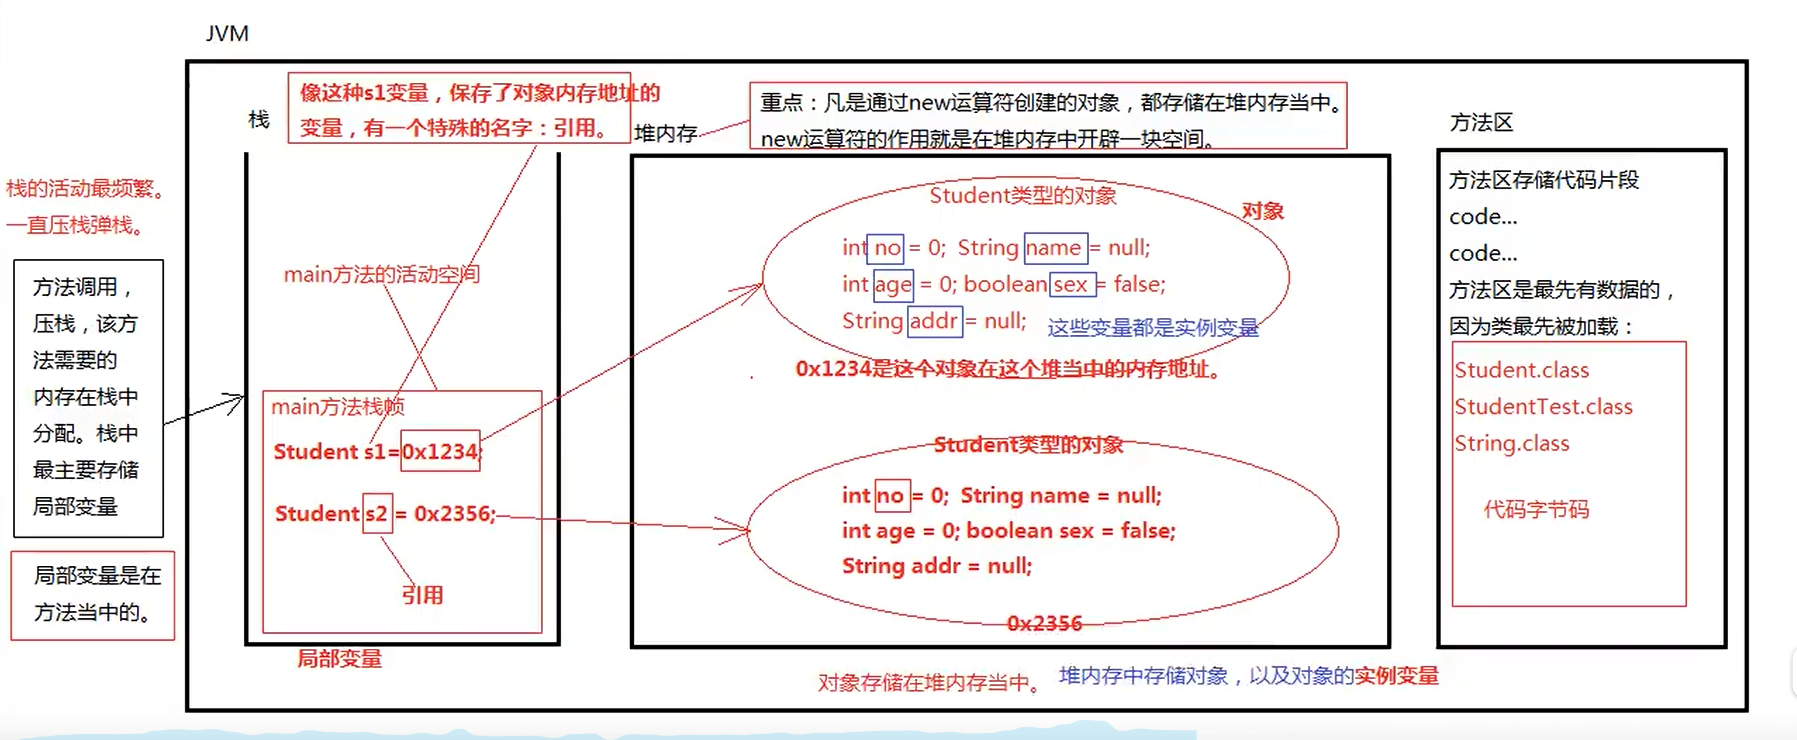
创建对象在JVM中的内存结构:
方法里面的变量属于局部变量,局部变量存储在栈内存当中。
方法外的变量属于全局变量。也成为实例变量(成员变量),实例变量不饿能通过类的方式去访问,只能通过对象的方式去访问。
对象和引用的区别:
对象是通过new出来的,在堆内存中存储。
引用是:局部变量(存储在栈中)保存了指向堆内存中对象的内存地址。
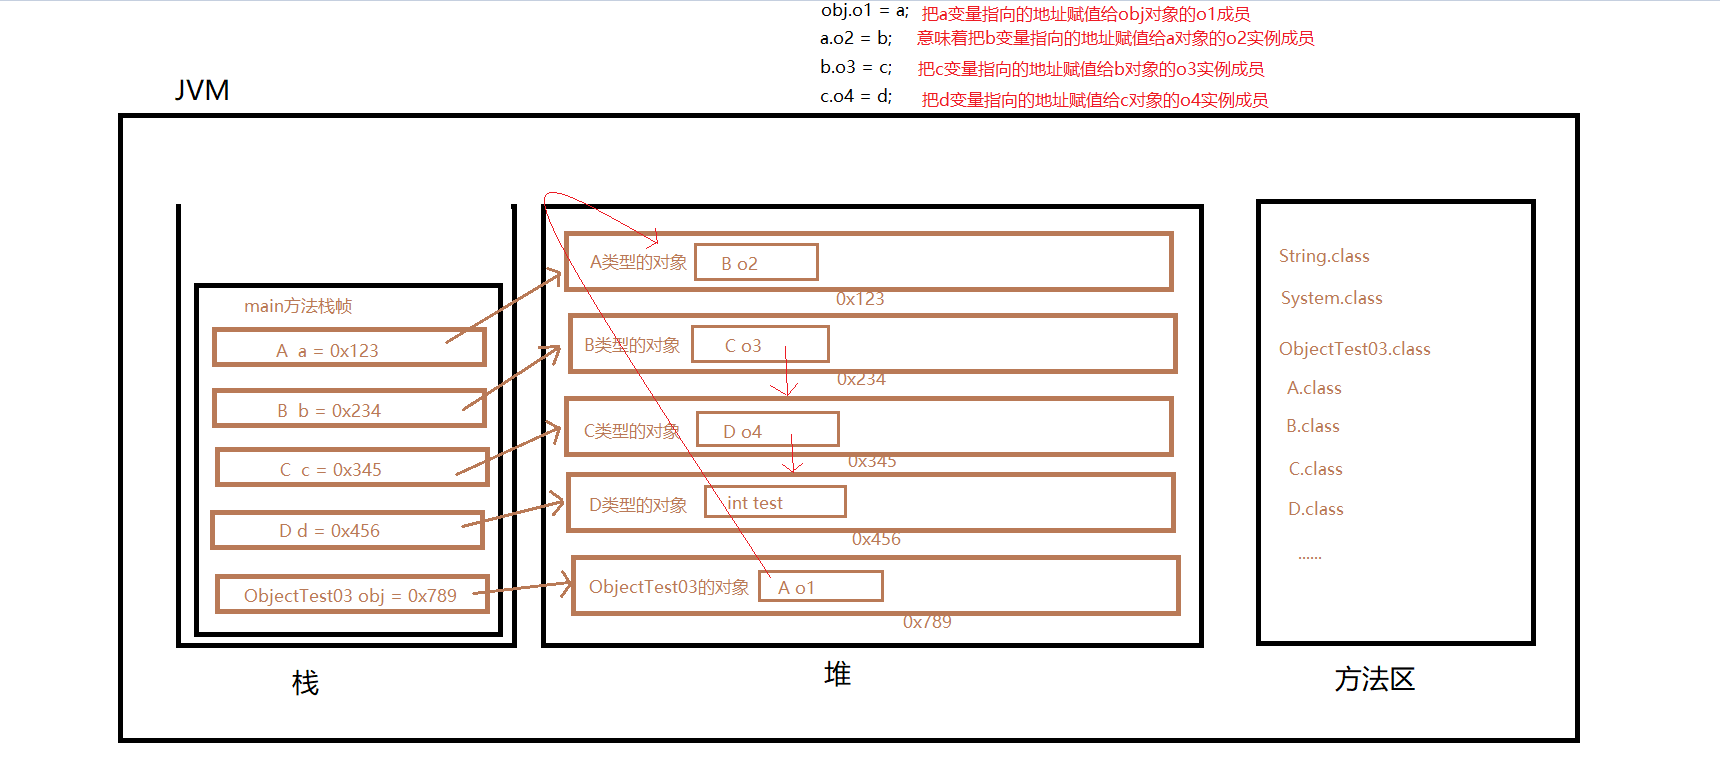
1 2 3 4 5 6 7 8 9 10 11 12 13 14 15 16 17 18 19 20 21 22 23 24 25 26 27 28 29 30 31 32 33 34 35 36 37 38 39 40 41 public class ObjectTest03 A o1; public static void main (String[] args) A a = new A(); B b = new B(); C c = new C(); D d = new D(); ObjectTest03 obj = new ObjectTest03(); obj.o1 = a; a.o2 = b; b.o3 = c; c.o4 = d; System.out.println(obj.o1.o2.o3.o4.test); } } class A B o2; } class B C o3; } class C D o4; } class D int test; }
代码在JVM中的图示化:
空指针
如果java中存在在栈中的局部变量(存着指向对象的地址)的地址不指向实例对象了,而指向null,那么存在在堆中的这个对象,就会被GC当垃圾回收了。
java中的垃圾回收器GC主要针对回收的是堆内存当中的垃圾数据,当没有任何引用指向一个对象的时候,那么这个对象就会被垃圾回收器回收。
空指针异常在什么时候发生?
只有在”空引用”访问”实例相关的属性和方法”的时候会出现空指针异常。
方法调用时参数传递 :
基本数据类型传递:
1 2 3 4 5 6 7 8 9 10 11 12 13 14 15 16 17 18 public class ObjectTest04 public static void main (String[] args) int i = 10 ; add(i); System.out.println(i); } public static void add (int i) i++; System.out.println(i); } }
引用类型传递:
1
2
3
4
5
6
7
8
9
10
11
12
13
14
15
16
17
18
19
20
21
public class ObjectTest05 public static void main (String[] args) Person p = new Person(); p.age = 10 ; add(p); System.out.println(p.age); } public static void add (Person x) x.age++; System.out.println(x.age); } } class Person int age; }
总结:在java中关于方法调用时参数传递实际上只有一个规则,无论是基本数据类型还是引用数据类型,在传递的时候都是将变量中保存的那个值复制一份,那个值可能是数值,可能是地址。
构造方法
构造方法是一个特殊的方法,是用来创建对象并且同时给对象属性赋值(实例变量的初始化)。
当一个类中没有提供任何构造方法,系统默认提供一个无参数的构造器方法。
构造方法的语法结构:
1
2
3
[修饰符列表] 构造方法名(形式参数列表){ 构造方法体; }
构造方法不需要指定返回值类型。
通常在构造方法体中给属性赋值,完成属性的初始化。
构造方法支持方法重载,在一个类中,构造方法可以有多个,它们的方法名都一样,只是参数列表不同。
构造方法是通过new来调用的。
封装的作用 :
保证内部结构的安全
屏蔽复杂,暴露简单
调用的时候简单
封装代码案例:
1 2 3 4 5 6 7 8 9 10 11 12 13 14 15 16 17 18 19 20 21 22 23 24 25 26 27 28 29 30 31 32 33 34 35 public class PersonTest public static void main (String[] args) Person p1 = new Person(); System.out.println(p1.age); p1.setAge(-1 ); System.out.println(p1.getAge()); } public class Person String name; private int age; public int getAge () return age; } public void setAge (int age) if (age<0 || age>150 ) { System.out.println("非法年龄,请重新赋值" ); return ; } this .age = age; } }
this和static :
static:
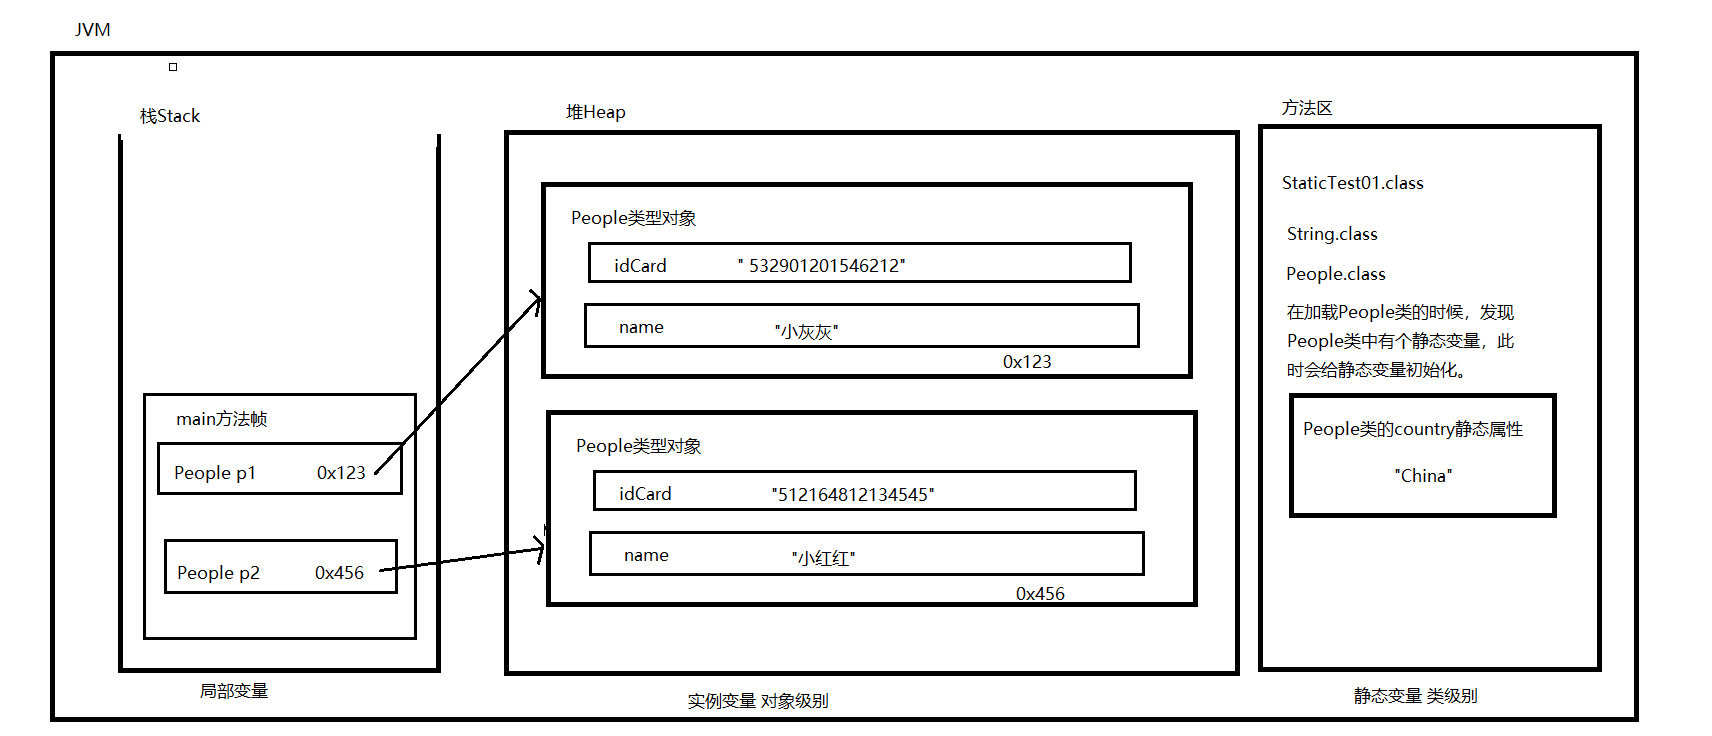
成员变量分为:实例变量和静态变量。
1
2
3
4
5
6
7
8
9
10
11
12
13
14
15
16
17
18
19
20
21
22
23
24
25
26
27
28
29
30
31
32
33
34
public class StaticTest01 public static void main (String[] args) People p1 = new People("532901201546212" ,"小灰灰" ); System.out.println(p1.idCard); System.out.println(p1.name); System.out.println(People.country); People p2 = new People("512164812134545" ,"小红红" ); System.out.println(p2.idCard); System.out.println(p2.name); System.out.println(People.country); } } class People String idCard; String name; static String country = "China" ; public People () } public People (String s1,String s2) this .idCard = s1; this .name = s2; } }
一个对象一份用实例,所有对象一份用静态。
静态方法可节省内存空间。
static静态代码块
使用static关键字定义的代码块称为静态代码块。
1
2
3
4
static { java语句; java语句; }
static静态代码块在类加载的时候执行,并且在main方法执行前执行,只执行一次。执行的顺序自上而下。
1 2 3 4 5 6 7 8 9 10 11 12 13 14 15 16 17 18 19 public class StaticTest03 static { System.out.println("A" ); } static { System.out.println("B" ); } public static void main (String[] args) System.out.println("D" ); } static { System.out.println("C" ); } }
static代码块可用来做一些初始化操作。比如记录类加载时候的日志等等。
实例代码块
1
2
3
4
5
6
7
8
9
10
11
12
13
14
15
16
17
18
19
20
21
22
23
24
25
26
27
28
29
30
public class InstanceCodeTest public static void main (String[] args) new InstanceCodeTest(); } { System.out.println("实例语句块执行" ); } public InstanceCodeTest () System.out.println("无参数构造方法执行" ); } public InstanceCodeTest (int num) System.out.println("有参数的构造方法执行" ); } }
实例语句块在构造方法执行前执行。
实例方法和静态方法:
静态方法加static修饰,调用的时候使用类名.的方式去调用。
实例方法可以调静态方法,静态方法不能调实例方法。
以后判断能不能调用,我们默认看看是不是实例方法或属性,然后默认在前面加上this.
this关键字
this是一个变量,一个引用。this保存着当前对象的内存地址,指向自身。所以this代表的就是”当前对象”。
this存储在堆内存当中对象的内部。
this只能使用在实例方法中。哪个对象调用这个实例方法,this就是哪个对象。
所以this表示的就是:当前对象。
this不存在于静态方法中。
this除了用在实例方法中,还可以用在构造方法中。
this() 的作用:
通过当前的构造方法去调用另一个本类的构造方法,可以使用this(实际参数列表)的方式去调用。this()语句必须放在构造方法中的第一行。
1
2
3
4
5
6
7
8
9
10
11
12
13
14
15
16
17
18
19
20
21
22
23
24
25
26
public class ThisTest03 private int year; private int month; private int day; public static void main (String[] args) ThisTest03 t1 = new ThisTest03(); System.out.println(t1.year+"年" +t1.month+"月" +t1.day+"日" ); ThisTest03 t2 = new ThisTest03(2020 ,8 ,14 ); System.out.println(t2.year+"年" +t2.month+"月" +t2.day+"日" ); } public ThisTest03 () this (1770 , 1 , 1 ); } public ThisTest03 (int year,int month,int day) this .year = year; this .month = month; this .day = day; } }
总结:
所有实例相关的都是先创建对象,通过引用.的方式来访问。
所有静态相关的都是直接采用类名.的方式来访问。
只要负责调用的方法a和被调用的方法b在同一个类中:
继承extends 继承的
基本作用:子类继承父类,代码可以得到复用。
主要作用:因为有了继承关系,才有了方法覆盖和多态机制。
java中只允许单继承。
但是我们可以产生间接继承的效果。
比如B继承A,C继承B,C还间接继承了A;
java中的类默认继承Oject类(老祖宗)。
除了构造方法以外,都可以继承,但是私有属性无法在子类中直接访问。
1
2
3
4
5
6
7
8
9
10
11
12
13
14
15
16
17
18
19
20
21
22
23
24
25
26
27
28
29
30
31
32
33
34
35
36
37
38
39
public class ExtendsTest01 private int money; public static void main (String[] args) Son s1 = new Son(); s1.setMoney(10000 ); s1.implement(); } public ExtendsTest01 () } public ExtendsTest01 (int money) this .money = money; } public void setMoney (int money) this .money = money; } public int getMoney () return this .money; } public void implement () System.out.println(this .getMoney()); } } class Son extends ExtendsTest01 }
方法重写(覆盖) 在字类继承父类的过程中,有一些行为可能不需要改进,但是有一些行为面临着必须改进,因为父类中继承过来的方法已经无法满足子类的需求。所以就进行方法重写。
1
2
3
4
5
6
7
8
9
10
11
12
13
14
15
16
17
18
19
20
21
22
23
24
25
26
27
28
29
30
31
32
public class OverRide public static void main (String[] args) Bird b1 = new Bird(); b1.move(); Cat c1 = new Cat(); c1.move(); } } class Animal public void move () System.out.println("动物在移动" ); } } class Bird extends Animal public void move () System.out.println("鸟儿在飞侠" ); } } class Cat extends Animal public void move () System.out.println("猫在走猫步" ); } }
方法覆盖的前提:
两个类必须有继承关系。
重写之后的方法和之间的方法具有相同的返回值类型,相同的方法名,相同的形式参数列表。
访问权限不能更低,可以更高。比如protected修饰的方法不能对public修饰的方法进行方法重写。
重写之后的方法不能比之前的方法抛出更多的异常,可以更少。
方法覆盖的注意事项:
方法覆盖只针对于方法,和属性无关
私有方法无法覆盖
构造方法不能被继承,所以构造方法也不能被覆盖
方法覆盖只是针对于实例方法,静态方法覆盖没有意义
多态 java中允许向上转型也允许向下转型,前提是两类中必须中必须有继承关系。
向上转型:子转父(自动类型转化)
向下转型:父转子(强制类型转化,需要加强制类型转化符)
多态表示多种形态:
多态指的是:父类型引用指向子类型对象 。包括编译阶段和运行阶段。
编译阶段:绑定父类的方法。
运行阶段:动态绑定子类型对象的方法。
1
2
3
4
5
6
7
8
9
10
11
12
13
14
15
16
17
18
19
20
21
22
23
24
25
26
27
28
29
30
31
32
33
34
35
36
37
38
39
40
41
42
43
44
45
46
47
48
49
50
51
52
53
54
55
56
57
58
59
60
61
62
63
64
65
66
67
public class Test01 public static void main (String[] args) Animal a1 = new Bird(); a1.move(); Animal a2 = new Cat(); a2.move(); Cat c1 = (Cat)a2; c1.catchMouse(); Animal a3 = new Bird(); Animal a4 = new Bird(); if (a4 instanceof Cat) { Cat c3 = (Cat)a4; c3.catchMouse(); }else { System.out.println("此处不能向下转型" ); } } } class Animal public void move () System.out.println("动物在移动" ); } } class Bird extends Animal public void move () System.out.println("鸟儿在飞侠" ); } } class Cat extends Animal public void move () System.out.println("猫在走猫步" ); } public void catchMouse () System.out.println("猫在抓老鼠" ); } }
instanceof :
instanceof在运行阶段动态判断
1 c1 instanceof Cat => 判断c1引用指向的堆内存中java对象是一个Cat,如果是为true ,否则false
在进行向下转型的时候,一定要用instanceof进行判断。
多态在开发中用到的例子 :
1
2
3
4
5
6
7
8
9
10
11
12
13
14
15
16
17
18
19
20
21
22
23
24
25
26
27
28
29
30
31
32
33
34
35
36
37
38
39
40
41
42
43
44
45
46
47
48
49
50
51
52
53
54
55
56
57
58
59
public class Test02 public static void main (String[] args) Master m1 = new Master(); m1.feed(new Catt()); m1.feed(new Dog()); m1.feed(new YingWu()); } } class Master Pet p1 = new Pet(); public void feed (Pet p1) p1.eat(); } } class Pet public void eat () System.out.println("宠物吃饭" ); } } class Dog extends Pet public void eat () System.out.println("狗吃饭" ); } public void swim () System.out.println("狗去游泳" ); } } class Catt extends Pet public void eat () System.out.println("猫吃饭" ); } } class YingWu extends Pet public void eat () System.out.println("鹦鹉吃饭" ); } }t
以上写法降低了Master和Dog以及Catt的耦合度,提高了软件的扩展性。
方法覆盖只针对实例方法,对静态方法无意义。
子类不能覆盖父类中私有的方法。
super super表示子类的构造方法调用父类的构造方法。
子类的第一行默认有一个super()调用父类的构造方法。
this()和super()不能在一个构造方法中共存。
所以在子类中的构造方法中,无论怎样,父类的构造方法都会先执行。
super()的作用是初始化父类型的特征。
1
2
3
4
5
6
7
8
9
10
11
12
13
14
15
16
17
18
19
20
21
22
23
24
25
26
27
28
29
30
31
32
33
34
35
36
37
38
39
40
41
42
43
44
45
46
47
48
49
50
51
52
53
public class SuperTest01 public static void main (String[] args) Son2 s1 = new Son2(20 ,"小灰灰" ,"云南大理" ); System.out.println(s1.getAddress()+s1.getName()+s1.getAge()); Son2 s2 = new Son2(); System.out.println(s2.getAddress()+s2.getName()+s2.getAge()); } } class Father private int age; private String name; public Father () super (); } public Father (int age,String name) super (); this .age = age; this .name = name; } public int getAge () return this .age; } public String getName () return this .name; } } class Son2 extends Father public String address; public Son2 () super (); } public Son2 (int age,String name,String address) super (age,name); this .address = address; } public String getAddress () return this .address; } }
super.和this.的区别 1 2 3 4 5 6 7 8 9 10 11 12 13 14 15 16 17 18 19 20 21 22 23 24 25 26 27 28 29 30 31 32 33 34 35 public class SuperTest02 public static void main (String[] args) Vip v1 = new Vip("小灰灰" ); v1.shopping(); } } class Customer String name; public Customer () } public Customer (String name) this .name = name; } } class Vip extends Customer String name; public Vip () } public Vip (String name) super (name); this .name = null ; } public void shopping () System.out.println(this .name); System.out.println(super .name); System.out.println(name); } }
this.name:当前对象的name属性。
super.name:当前对象的父类型特征中的name属性。
父中有,子中也有,在子中访问父中的特征就用super.,子中的属性直接用this.。
super不是引用。super不保存内存地址,super也不指向任何对象。
super表示的的是当前对象内部的那一块父类型的特征。
super.不仅可以访问属性,还可以访问已经被覆盖的父亲中的方法。
final 常量。
被final修饰的类和方法无法被继承和覆盖。
被final修饰的引用只能指向一个对象,并且永远只能指向该对象。
static和final联合修饰的变量称为”常量”,常量名建议大写。
常量和静态变量都是存储在方法区,在类加载时初始化。
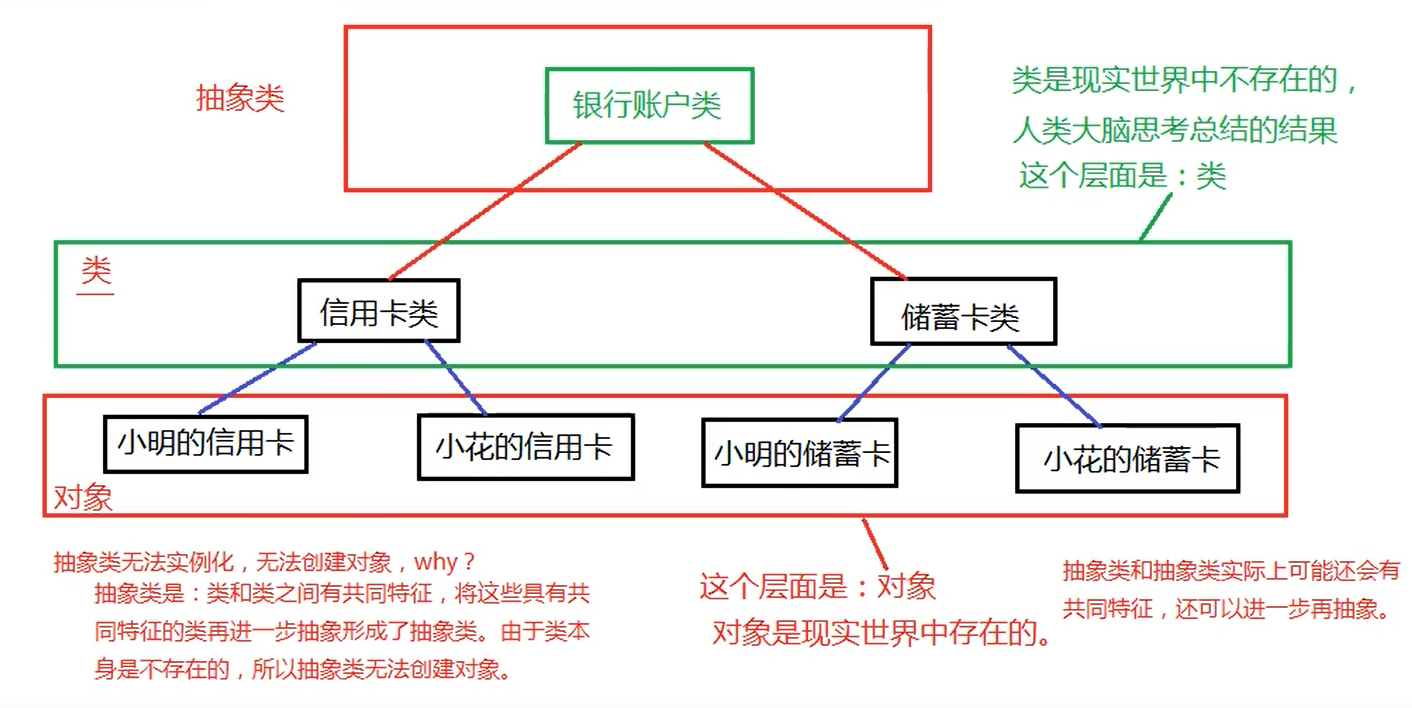
抽象类
类和类之间具有共同特征,将这些共同特征提取出来,形成的就是抽象类。
类本身是不存在的,所以抽象类无法创建对象。
抽象类也属于引用数据类型。
抽象类是用来被子类继承的。
1 2 3 [修饰符列表] abstract class 类名 类体; }
抽象方法 抽象方法表示没有实现的方法,没有方法体的方法。
抽象类里不一定有抽象方法,抽象方法必须在抽象类中。
1 [修饰符列表] abstract void 方法名;
1 2 3 4 5 6 7 8 9 10 11 12 13 14 15 16 17 18 19 20 21 22 23 public class AbstractTest01 public static void main (String[] args) Animal a1 = new Bird(); a1.move(); } } abstract class Animal public abstract void move () } class Bird extends Animal public void move () System.out.println("鸟儿在飞翔" ); } }
接口 接口也是一种引用类型,编译之后也是.class文件,接口是完全抽象的。
接口支持多继承:
1 2 3 4 5 6 7 8 9 10 11 12 13 14 15 16 17 18 19 20 21 22 23 24 25 26 27 28 29 30 31 public class InterfaceTest01 public static void main (String[] args) System.out.println(MyMath.NAME); } } interface A } interface B } interface C extends A ,B } interface MyMath public static final double PI = 3.141592 ; String NAME = "小灰灰" ; public abstract int sub (int a,int b) int sum (int a,int b) }
接口中只包含两部分内容:常量和抽象方法。
接口中所有元素都是public修饰的。
类与接口 接口与接口之间叫继承,接口与类之间叫实现。
继承使用extends关键字来完成,实现用implements关键字完成。
接口中使用多态:
1 2 3 4 5 6 7 8 9 10 11 12 13 14 15 16 17 18 19 20 21 22 23 24 25 26 27 28 public class InterfaceTest02 public static void main (String[] args) Test m1 = new MyTest(); System.out.println(m1.sum(10 , 20 )); } } interface Test double PI = 3.14513 ; int sum (int a,int b) int sub (int a,int b) } class MyTest implements Test public int sum (int a,int b) return a+b; } public int sub (int a, int b) return a-b; } }
类实现多个接口继承 1 2 3 4 5 6 7 8 9 10 11 12 13 14 15 16 17 18 19 20 21 22 23 24 25 26 27 28 29 30 31 32 33 34 35 36 37 38 39 40 41 public class InterfaceTest03 public static void main (String[] args) H h1 = new L(); h1.m1(); J j2 = (J)h1; j2.m2(); J j1 = new L(); K k1 = new L(); } } interface H void m1 () } interface J void m2 () } interface K void m3 () } class L implements H ,J ,K public void m1 () System.out.println("m1........" ); } public void m2 () System.out.println("m2........" ); } public void m3 () System.out.println("m3........" ); } }
继承和接口同时使用的时候,extends在前,implement在后:
1 2 3 4 5 6 7 8 9 10 11 12 13 14 15 16 17 18 19 20 21 22 23 24 25 26 27 28 29 30 31 32 33 34 35 36 37 38 39 40 41 42 43 44 public class InterfaceTest04 public static void main (String[] args) Flyable f1 = new Cat(); f1.fly(); Flyable f2 = new Dog(); f2.fly(); Animal a1 = new Dog(); if (a1 instanceof Dog) { Dog d1 = (Dog)a1; d1.swim(); } } } class Animal } interface Flyable void fly () } class Cat extends Animal implements Flyable public void fly () System.out.println("猫会飞侠" ); } } class Dog extends Animal implements Flyable public void fly () System.out.println("我是一只会飞的狗" ); } public void swim () System.out.println("狗刨" ); } }
接口在开发中的作用 接口在开发中的作用类似于多态。宗旨在面向抽象编程。
接口类似于插槽,扩展性好,可插拔。
面向接口编程,可以降低程序的耦合度,提高程序的扩展性。相当于多态的作用。
案例:
1 2 3 4 5 6 7 8 9 10 11 12 13 14 15 16 17 18 19 20 21 22 23 24 25 26 27 28 29 30 31 32 33 34 35 36 37 38 39 40 41 42 43 44 45 46 47 48 49 50 51 52 53 54 55 56 57 58 59 60 61 62 public class InterfaceTest05 public static void main (String[] args) Menu m1 = new ChinaCook(); Customer c1 = new Customer(m1); c1.order(); Menu m2 = new American(); Customer c2 = new Customer(m2); c2.order(); } } class Customer private Menu m1; public Customer () } public Customer (Menu m1) this .m1 = m1; } public void setM1 (Menu m1) this .m1 = m1; } public Menu getM1 () return m1; } public void order () m1.xihongshichaodan(); m1.fanqianniurou(); } } class ChinaCook implements Menu public void xihongshichaodan () System.out.println("中国厨师做的西红柿炒鸡蛋" ); } public void fanqianniurou () System.out.println("中国厨师做的番茄牛肉" ); } } class American implements Menu public void xihongshichaodan () System.out.println("美国厨师做西红柿炒鸡蛋" ); } public void fanqianniurou () System.out.println("美国厨师做番茄牛肉" ); } } interface Menu void xihongshichaodan () void fanqianniurou () }
以上思想为OCP开发思想,降低程序的耦合度。
任一个接口都有调用者和实现者,接口可以将调用者和实现者解耦合,调用者面向接口调用,实现者面向接口实现。
接口和抽象类的区别
接口类是半抽象的。
接口是完全抽象的。
抽象类中有构造方法。
接口类中没有构造方法。
接口和接口之间支持多继承。
类和类之间只能支持单继承。
一个类可以实现多个接口。
一个抽类只能继承一个抽象类。
类型与类型之间的联系:继承 (is a)、关联(has a)、实现(like a)。
包和import 两个java类,不再同一个包中,使用import来引入。
import用来导入需要的类。
jdk中的lang包下的类不需要使用import导入,但是其子目录需要导入。比如System、String等sun公司写好的类。
访问控制权限 访问控制权限有四个:
private:私有的,只能在本类中访问。
protected:受保护的。只供子类访问。
public:公开的,在任何位置都能访问。
访问控制修饰符
本类
同包
子类
任意位置
public
可以
可以
可以
可以
protected
可以
可以
可以
不行
默认
可以
可以
不行
不行
private
可以
不行
不行
不行
关系:public > protected > 默认 > private 。
访问控制权限可以修饰:属性(4个都能用)、方法(4个都能用)、类(public和默认)、接口(public和默认)…….
Object类的方法 equals()方法 在java中,一般都需要重写toString()方法和equal()方法 。
equals()一般比较的是内存地址,所以需要重写。
重写equal()方法的案例:
1 2 3 4 5 6 7 8 9 10 11 12 13 14 15 16 17 18 19 20 21 22 23 24 25 26 27 28 29 30 31 32 33 34 35 36 37 38 39 40 41 42 43 44 45 public class Test01 public static void main (String[] args) Mytime m1 = new Mytime(2000 ,04 ,06 ); Mytime m2 = new Mytime(2000 ,04 ,06 ); System.out.println(m1.equals(m1)); System.out.println(m1.equals(m2)); Mytime m3 = new Mytime(1999 ,04 ,06 ); System.out.println(m3.equals(m2)); } } class Mytime int year; int month; int day; public Mytime () } public Mytime (int year,int month,int day) this .year = year; this .month = month; this .day = day; } @Override public boolean equals (Object obj) if (this == obj) return true ; if (obj == null || !(obj instanceof Mytime)) { return false ; } int year1 = this .year; int month1 = this .month; int day1 = this .day; Mytime m1 = (Mytime)obj; int year2 = m1.year; int month2 = m1.month; int day2 = m1.day; return year1 == year2 && month1 == month2 && day1 == day2; } }
字符串与字符串之间判断需要用equals来判断,不能用==来判断,因为String是一个类,==只能判断它们的内存地址 。
String类的equals()和toString()已经被sun公司重写好了,直接调用即可。
1 2 3 4 5 6 7 8 9 10 11 12 13 14 public class Test02 public static void main (String[] args) String s1 = new String("小灰灰" ); String s2 = new String("小灰灰" ); System.out.println(s1.toString()); System.out.println(s2.toString()); System.out.println(s1 == s2); System.out.println(s1.equals(s2)); } }
结论:判断基本数据类型是都相等使用==,判断引用数据类型是否相等使用equals。
当遇到本类中属性属于引用数据类型的时候,需要重写equals
1 2 3 4 5 6 7 8 9 10 11 12 13 14 15 16 17 18 19 20 21 22 23 24 25 26 27 28 29 30 31 32 33 34 35 36 37 38 39 40 41 42 43 44 45 46 47 48 49 50 51 52 53 54 55 56 57 public class Test04 public static void main (String[] args) User u1 = new User("小灰灰" ,new Address("云南省" ,"昆明市" ,"春城街道" )); User u2 = new User("小灰灰" ,new Address("云南省" ,"昆明市" ,"春城街道" )); User u3 = new User("小灰灰" ,new Address("云南省" ,"安宁市" ,"安宁街道" )); System.out.println(u1.equals(u2)); System.out.println(u1.equals(u3)); } } class User String name; Address address; public User () } public User (String name,Address address) this .name = name; this .address = address; } @Override public boolean equals (Object obj) if (obj == null || !(obj instanceof User)) return false ; if (this == obj) return true ; User u = (User)obj; return this .name.equals(u.name) && this .address.equals(u.address); } } class Address String provice; String city; String street; public Address () } public Address (String provice,String city,String street) this .provice = provice; this .city = city; this .street = street; } @Override public boolean equals (Object obj) if (obj == null || !(obj instanceof Address)) return false ; if (this == obj) return true ; Address a = (Address)obj; return this .city.equals(a.city) && this .provice.equals(a.provice) && this .street.equals(a.street); } }
finalize()方法 finalize()方法 是为程序员准备的一个时机——垃圾销毁时机,此方法只负责重写,不需要手动调用。
源代码:
1 protected void finalize () throws Throwable
匿名内部类 一般代码:
1 2 3 4 5 6 7 8 9 10 11 12 13 14 15 16 17 18 19 20 21 22 23 24 25 26 27 28 29 30 31 public class Test06 public static void main (String[] args) Mymath m1 = new Mymath(); m1.add(new ComputeInt(), 10 , 20 ); } } interface Compute int add (int x,int y) } class ComputeInt implements Compute public int add (int x,int y) return x+y; } } class Mymath public void add (Compute c,int x,int y) int result = c.add(x, y); System.out.println(result); } }
改造为匿名内部类:
1 2 3 4 5 6 7 8 9 10 11 12 13 14 15 16 17 18 19 20 21 22 23 24 25 26 27 28 29 30 31 32 33 34 35 36 37 package AnonymousInternalClass;public class Test01 public static void main (String[] args) Mymath m = new Mymath(); m.add(new Compute() { public int add (int x,int y) return x+y; } }, 10 , 20 ); } } interface Compute int add (int x,int y) } class Mymath public void add (Compute c,int x,int y) int result = c.add(x, y); System.out.println(result); } }
匿名内部类也就是没有名字的内部类,
正因为没有名字,所以匿名内部类只能使用一次,它通常用来简化代码编写,
但使用匿名内部类还有个前提条件:必须继承一个父类或实现一个接口。
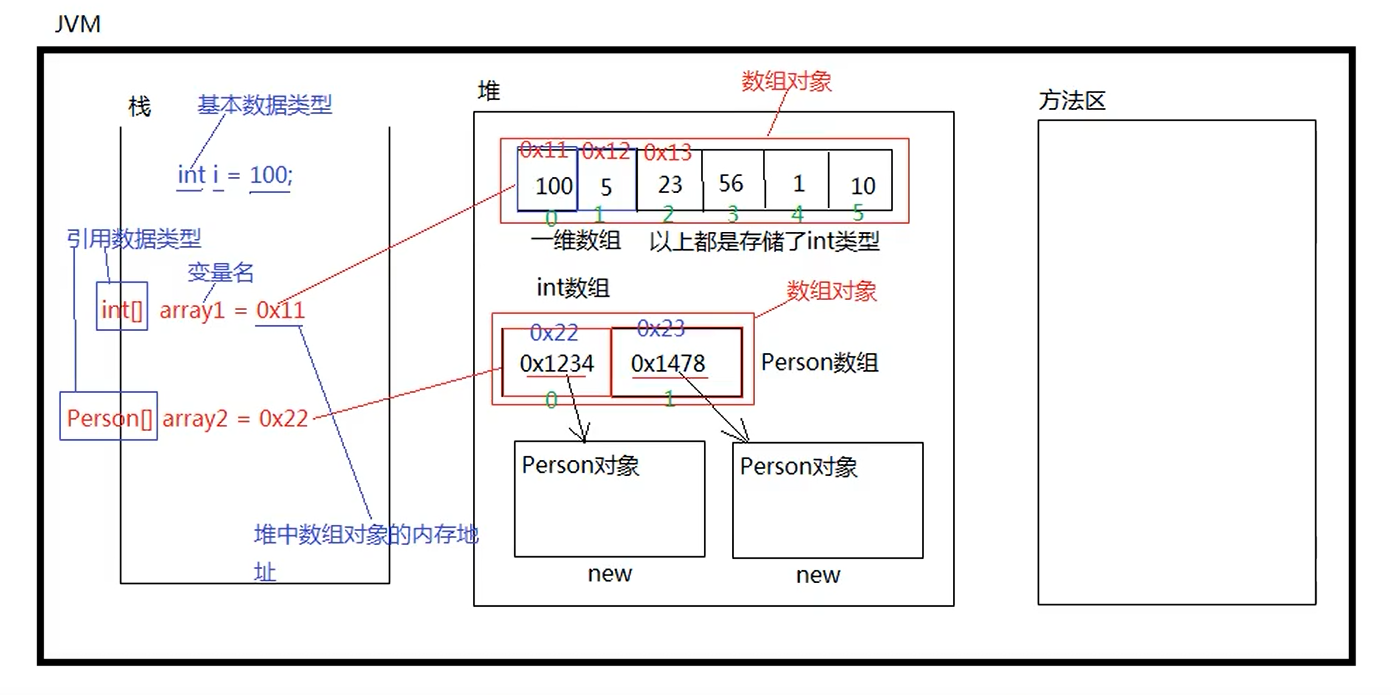
数组 数组当中可以存储基本数据类型的数据,也可以存储引用数据类型的数据。
数组是引用数据类型,数组对象是存储在堆内存当中。
数组存对象存的是对象的引用(内存地址) ,然后地址指向对象,并不是把整个对象都放进去。
数组一旦创建,长度不可变。
数组在内存中,每个元素都是有规则的排列着,每个元素的内存地址是连续的。一个数组的内存地址就是下标为0的元素的内存地址。
数组的内存图:
数组的优点和缺点 优点 :查询/查找/检索某个下标上的元素效率极高。查询效率极高。
检索效率高的原因:
每一个元素的内存地址在空间上存储是连续的。
每一个数据元素相同,占用的空间大小都一样。
知道一个数据元素的地址,知道每一个数据元素占用的空间大小,又知道下标,就可以计算出某一个下标上元素的内存地址。
直接通过内存地址定位元素,所以数组的检索效率是最高的。
缺点 :
因为数组的每个元素内存地址都是连续的,所以在数组中增加元素和删除元素的时候,效率极低,会涉及到后面的元素都向前或向后的操作。
很难开辟一块很大的连续的内存空间。
一维数组 语法:
1 2 3 4 5 int [] array1;double [] array2;boolean [] array3;String[] array4; Object[] array5;
初始化一维数组 :
1 int [] array = {100 ,200 ,2300 ,1500 };
1 2 int [] array = new int [5 ]; Object[] obj = new Object[5 ];
数组中存储引用数据类型 :
1 2 3 4 5 6 7 8 9 10 11 12 13 14 15 16 17 18 19 20 21 22 23 24 25 26 27 28 29 30 31 32 33 34 35 36 37 38 39 40 41 42 43 44 45 46 47 48 49 50 51 package Array;public class ArrayTest02 public static void main (String[] args) Animal[] a = {new Cat(),new Bird()}; for (int i = 0 ; i < a.length; i++) { a[i].move(); if (a[i] instanceof Cat) { Cat c1 = (Cat)a[i]; c1.catchs(); }else if (a[i] instanceof Bird) { Bird b1 = (Bird)a[i]; b1.singing(); } } } } class Animal public void move () System.out.println("动物在移动" ); } } class Bird extends Animal public void move () System.out.println("鸟儿在飞翔" ); } public void singing () System.out.println("鸟儿在歌唱" ); } } class Cat extends Animal public void move () System.out.println("猫在走猫步" ); } public void catchs () System.out.println("猫在吃鱼" ); } }
一维数组的扩容 :
java中对数组的扩容是:建一个大容量数组,将小容量数组中的数据挨个拷贝到大数组中。数组扩容效率较低。
数组拷贝 :
使用System类下的arrayCopy()方法:
格式:
1 public static native void arraycopy (Object src, int srcPos,Object dest, int destPos, int length)
案例:
1 2 3 4 5 6 7 8 9 10 11 12 13 14 15 16 17 18 19 20 21 22 23 24 package Array;public class ArrayTest03 public static void main (String[] args) int [] src = {1 ,51 ,40 ,23 ,41 ,15 ,66 }; int [] des = new int [20 ]; System.arraycopy(src, 2 , des, 2 , 5 ); for (int i = 0 ; i < des.length; i++) { System.out.print(des[i]+" " ); } String[] s1 = {"hello java" ,"hello vue" ,"hello c" }; String[] s2 = new String[20 ]; System.arraycopy(s1, 0 , s2, 0 , s1.length); for (int i = 0 ; i < s2.length; i++) { System.out.print(s2[i] + " " ); } } }
二维数组 二维数组是一个特殊的一维数组,三维数组是一个特殊的二维数组,以此类推等等…
语法 :
1 int [][] array = {{100 ,200 ,300 },{12 ,30 ,10 },{20 ,84 ,46 }};
1 2 int [][] array = new int [3 ][4 ];Object[][] obj = new Object[3 ][4 ];
遍历二维数组 :
1 2 3 4 5 6 7 8 9 10 11 12 13 14 15 16 17 18 package Array;public class ArrayTest04 public static void main (String[] args) int [][] array = {{100 ,200 ,300 },{12 ,30 ,10 },{20 ,84 ,46 }}; for (int i = 0 ; i < array.length; i++) { for (int j = 0 ; j < array[i].length; j++) { System.out.print(array[i][j]+" " ); } System.out.println(); } int [] a1 = array[0 ]; System.out.println(a1.length); } }
酒店管理系统:
1 2 3 4 5 6 7 8 9 10 11 12 13 14 15 16 17 18 19 20 21 22 23 24 25 26 27 28 29 30 31 32 33 34 35 36 37 38 39 40 41 42 43 44 45 46 47 48 49 50 51 52 53 54 55 56 57 58 59 60 61 62 63 64 65 66 67 68 69 70 71 72 73 74 75 76 77 78 79 80 81 82 83 84 85 86 87 88 89 90 91 92 93 94 95 96 97 98 99 100 101 102 103 104 105 106 107 108 109 110 111 112 113 114 115 116 117 118 119 120 121 122 123 124 125 126 127 128 129 130 131 132 133 134 135 136 137 138 139 140 package Array;public class ArrayTest06 public static void main (String[] args) Room f101 = new Room(101 ,"大床房" ,true ); Room f102 = new Room(102 ,"大床房" ,true ); Room f103 = new Room(103 ,"大床房" ,true ); Room f104 = new Room(104 ,"大床房" ,true ); Room f105 = new Room(105 ,"大床房" ,true ); Room s201 = new Room(201 ,"标间" ,true ); Room s202 = new Room(202 ,"标间" ,true ); Room s203 = new Room(203 ,"标间" ,true ); Room s204 = new Room(204 ,"标间" ,true ); Room s205 = new Room(205 ,"标间" ,true ); Room t301 = new Room(301 ,"单人房" ,true ); Room t302 = new Room(302 ,"单人房" ,true ); Room t303 = new Room(303 ,"单人房" ,true ); Room t304 = new Room(304 ,"单人房" ,true ); Room t305 = new Room(305 ,"单人房" ,true ); Room[][] rooms ={{f101,f102,f103,f104,f105},{s201,s202,s203,s204,s205},{t301,t302,t303,t304,t305}}; User admin = new User(rooms); admin.status(); admin.booking(f101); admin.status(); admin.retreat(f101); admin.status(); admin.booking(t305); admin.status(f101); System.out.println(f101.equals(f103)); } } class User private Room[][] rooms; public User () } public User (Room[][] rooms) this .rooms = rooms; } public void booking (Room rooms) if (rooms.getFree() == false ) { System.out.println("该房间已经被其它客人预定了" ); return ; } rooms.setFree(false ); System.out.println("房间" +rooms.getId()+"预定成功" ); } public void retreat (Room rooms) rooms.setFree(true ); System.out.println("房间" +rooms.getId()+"退房成功" ); } public void status () System.out.println("所有房间状态:" ); for (int i = 0 ; i < this .rooms.length; i++) { for (int j = 0 ; j < this .rooms[i].length; j++) { System.out.println("[" +"房间号:" +this .rooms[i][j].getId()+" " +"房间类型:" +this .rooms[i][j].getType()+" " +"是否空闲:" +(this .rooms[i][j].getFree()?"空闲" :"占用" )+"]" ); } } } public void status (Room room) System.out.println(room); } } class Room private int id; private String type; private boolean free; public Room () } public Room (int id,String type,boolean free) this .id = id; this .type = type; this .free = free; } public int getId () return id; } public void setId (int id) this .id = id; } public String getType () return type; } public void setType (String type) this .type = type; } public boolean getFree () return free; } public void setFree (boolean free) this .free = free; } @Override public String toString () return "[" +"房间号:" +this .getId()+" " +"房间类型:" +this .getType()+" " +"是否空闲:" +(this .getFree()?"空闲" :"占用" )+"]" ; } @Override public boolean equals (Object obj) if ((obj == null ) || !(obj instanceof Room)) return false ; if (this == obj) return true ; Room room = (Room)obj; return this .id == room.id; } } class Hotel private Room[][] rooms; public Hotel () } public Hotel (Room[][] rooms) this .rooms = rooms; } public void setRooms (Room[][] rooms) this .rooms = rooms; } public Room[][] getRooms() { return rooms; } }
修改版酒店管理系统
1 2 3 4 5 6 7 8 9 10 11 12 13 14 15 16 17 18 19 20 21 22 23 24 25 26 27 28 29 30 31 32 33 34 35 36 37 38 39 40 41 42 43 44 45 46 47 48 49 50 51 52 53 54 55 56 57 58 59 60 61 62 63 64 65 66 67 68 69 70 71 72 73 74 75 76 77 78 79 80 81 82 83 84 85 86 87 88 89 90 91 92 93 94 95 96 97 98 99 100 101 102 103 104 105 106 107 108 109 110 111 112 113 114 115 116 117 118 119 120 121 122 123 124 125 126 127 128 129 130 131 132 133 134 135 136 137 138 139 140 141 142 143 144 145 146 147 148 149 150 package Array;import java.util.Scanner;public class ArrayTest07 public static void main (String[] args) Hotel hotel = new Hotel(); while (true ) { System.out.println("欢迎使用酒店管理系统,请输入编号来实现对用功能:[1]查看房间列表。[2]订房。[3]退房。[4]查看空闲房间。[0]退出系统" ); System.out.println("请输入对应功能编号选择功能:" ); Scanner s = new Scanner(System.in); int i = s.nextInt(); if (i==1 ) { hotel.print(); }else if (i==2 ) { System.out.println("请输入要预定的房间号" ); Scanner s2 = new Scanner(System.in); int res = s2.nextInt(); hotel.booking(res); }else if (i==3 ) { System.out.println("请输入要退的房间" ); Scanner s3 = new Scanner(System.in); int res = s3.nextInt(); hotel.retreat(res); }else if (i==4 ) { hotel.seeFree(); }else if (i==0 ) { return ; }else { System.out.println("请输入正确的序号" ); } } } } class Room private int id; private String type; private boolean isFree; public Room () } public Room (int id,String type,boolean isFree) this .id = id; this .type = type; this .isFree = isFree; } public void setId (int id) this .id = id; } public int getId () return id; } public void setFree (boolean isFree) this .isFree = isFree; } public boolean getFree () return this .isFree; } public void setType (String type) this .type = type; } public String getType () return type; } @Override public String toString () return "[" +"房间号:" +this .id+",房间类型:" +this .type+",是否空闲:" +(this .isFree?"空闲" :"占用" )+"]" ; } } class Hotel private Room[][] rooms; public Hotel () this .rooms = new Room[3 ][5 ]; for (int i = 0 ; i < rooms.length; i++) { for (int j = 0 ; j < rooms[i].length; j++) { if (i == 0 ) { rooms[i][j] = new Room((i+1 )*100 +j+1 ,"大床房" ,true ); }else if (i == 1 ) { rooms[i][j] = new Room((i+1 )*100 +j+1 ,"标间" ,true ); }else if (i == 2 ) { rooms[i][j] = new Room((i+1 )*100 +j+1 ,"单人房" ,true ); } } } } public Hotel (Room[][] rooms) this .rooms = rooms; } public void setRooms (Room[][] rooms) this .rooms = rooms; } public Room[][] getRooms() { return rooms; } public void print () for (int i = 0 ; i < rooms.length; i++) { for (int j = 0 ; j < rooms[i].length; j++) { System.out.print(rooms[i][j]); } System.out.println(); } } public void booking (int roomId) if (this .rooms[roomId / 100 - 1 ][(roomId % 100 )-1 ].getFree() == false ) { System.out.println("该房间已经被预定了,您重新挑选一间没有被预定过的" ); return ; } this .rooms[roomId / 100 -1 ][(roomId % 100 )-1 ].setFree(false ); System.out.println("预定成功" ); } public void retreat (int id) this .rooms[(id-1 /100 )][(id%100 )-1 ].setFree(true ); System.out.println(id+"房间退房成功" ); } public void seeFree () for (int i = 0 ; i < this .rooms.length; i++) { for (int j = 0 ; j < this .rooms[i].length; j++) { if (this .rooms[i][j].getFree() == true ) { System.out.print(this .rooms[i][j]); System.out.println(); } } } } }
冒泡排序算法 使用冒泡排序法对数组进行从大到小排序:
比较的数据:2,8,4,21,3,16,18
第一次循环:
2,8,4,21,3,16,18 (第一次比较,不交换)
2,4,8,21,3,16,18(第二次比较,交换)
2,4,8,21,3,16,18 (第三次比较,不交换)
2,4,8,3,21,16,78 (第四次比较,交换)
2,4,8,3,16,21,78(第五次比较,交换)
2,4,8,3,16,21,78 (第六次比较,不交换)
最终冒泡最大的数字:78
第二次循环:
2,4,8,3,16,21 (第一次比较,不交换)
2,4,8,3,16,21 (第二次比较,不交换)
2,4,3,8,16,21 (第三次比较,交换)
2,4,3,8,16,21 (第四次比较,不交换)
2,4,3,8,16,21 (第五次比较,不交换)
最终获得最大冒泡数字:21
第三次循环:
2,4,3,8,16 (第一次比较,不交换)
2,3,4,8,16 (第二次比较,交换)
2,3,4,8,16 (第三次比较,不交换)
2,3,4,8,16 (第四次比较,不交换)
最终获得最大冒泡数字:16
第四次循环:
2,3,4,8 (第一次比较,不交换)
2,3,4,8 (第二次比较,不交换)
2,3,4,8 (第三次比较,不交换)
最终获得最大冒泡数字:8
第五次循环:
2,3,4 (第一次比较,不交换)
2,3,4 (第二次比较,不交换)
最终获得最大冒泡数字:4
第六次循环:
2,3 (第一次比较,不交换)
最终获得最大冒泡数字:3
代码如下:
1 2 3 4 5 6 7 8 9 10 11 12 13 14 15 16 17 18 19 20 21 22 23 24 25 26 27 28 29 package Array;public class ArrayTest08 public static void main (String[] args) int [] arr = {2 ,8 ,14 ,21 ,3 ,16 ,18 }; int count = 0 ; for (int i = arr.length-1 ; i > 0 ; i--) { for (int j = 0 ; j < i; j++) { count+=1 ; if (arr[j]>arr[j+1 ]) { int temp; temp = arr[j]; arr[j] = arr[j+1 ]; arr[j+1 ] = temp; } } } System.out.println("比较次数:" +count); for (int i = 0 ; i < arr.length; i++) { System.out.print(arr[i]+" " ); } } }
选择排序法 选择排序比冒泡排序的效率要高的多,每循环一次,找出最小的元素,然后与最前面的元素交换位置。
数组:5,1,4,3,9
第一次循环:
参与比较的数据:5,1,4,3,9
结果:1,5,4,3,9
第二次循环:
参与比较的数据:5,4,3,9
结果:3,4,5,9
第三次循环:
第四次循环:
实现代码:
1 2 3 4 5 6 7 8 9 10 11 12 13 14 15 16 17 18 19 20 21 22 23 24 25 26 27 28 29 30 31 32 33 package Array;public class ArrayTest09 public static void main (String[] args) int [] arr = {2 ,4 ,1 ,6 ,3 }; int count = 0 ; for (int i = 0 ; i < arr.length-1 ; i++) { int min = i; for (int j = i+1 ; j < arr.length; j++) { count+=1 ; if (arr[j] < arr[min]) { min = j; } } if (min != i) { int temp; temp = arr[i]; arr[i] = arr[min]; arr[min] = temp; } } System.out.println("比较的次数是:" +count); for (int i = 0 ; i < arr.length; i++) { System.out.print(arr[i]+" " ); } } }
冒泡排序和选择排序的比较次数不变,但是选择排序的交换次数减少了。
二分法查找算法(折半查找) 二分法查找算法是基于数组已经拍好序了。
二分法查找的终止条件:一直折半,直到中间的那个元素恰好是被查找的元素。
实现代码:
1 2 3 4 5 6 7 8 9 10 11 12 13 14 15 16 17 18 19 20 21 22 23 24 25 26 27 28 29 30 31 32 33 34 35 package Array;public class ArrayTest10 public static void main (String[] args) int [] arr = {100 ,200 ,312 ,380 ,420 ,430 ,600 ,800 ,1500 }; int index = binarySearch(arr,800 ); System.out.println(index); } public static int binarySearch (int [] arr, int dest) int begin = 0 ; int end = arr.length-1 ; while (begin <= end) { int mid = (begin + end)/2 ; if (arr[mid] == dest) { return mid; }else if (arr[mid] < dest) { begin = mid+1 ; }else { end = mid-1 ; } } return -1 ; } }
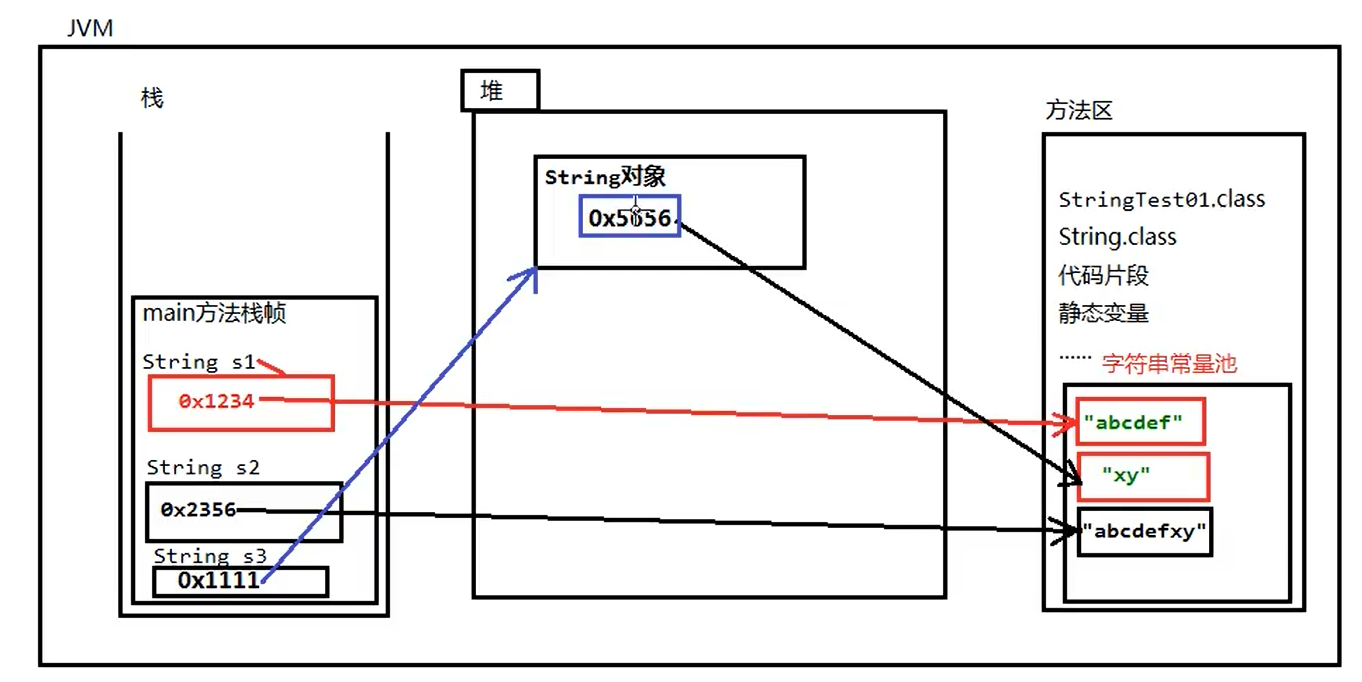
String String表示字符串类型,属于引用数据类型,每一个字符串都是一个String对象,在java中规定,字符串自创建开始是不可变的,创建起来的一个个字符串对象都是直接存储在方法区的字符串常量池中 。
但是通过语法String s3 = new String("xy")是在堆中开辟内存的,但是堆中的对象存储的并不是字符串,而是字符串所在的地址。
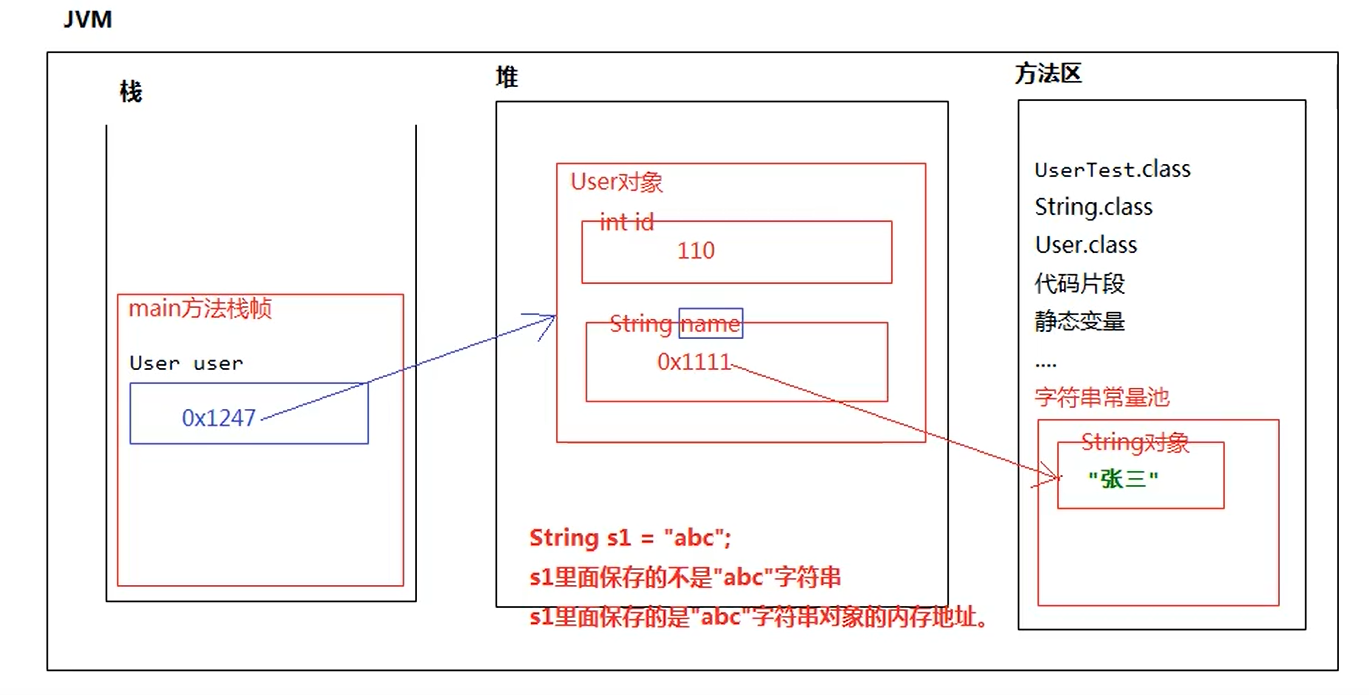
在创建对象的过程中,如果对象中的实例变量中有String类型的变量,则代码和内存图是:
1 2 3 4 5 6 7 8 9 10 11 12 13 14 15 16 17 18 19 20 21 22 23 24 25 26 27 28 29 30 31 32 33 34 35 36 37 38 39 40 package String;import java.util.Objects;public class StringTest02 public static void main (String[] args) User user = new User(110 ,"张三" ); System.out.println(user.getId()); System.out.println(user.getName()); } } class User private int id; private String name; public User () } public User (int id, String name) this .id = id; this .name = name; } public void setId (int id) this .id = id; } public int getId () return id; } public void setName (String name) this .name = name; } public String getName () return name; } }
1 2 3 4 5 6 7 8 9 10 11 12 13 14 15 16 package String;public class StringTest03 public static void main (String[] args) String s1 = "java" ; String s2 = "java" ; System.out.println(s1 == s2); String s3 = new String("java" ); String s4 = new String("java" ); System.out.println(s3 == s4); System.out.println(s3.equals(s4)); } }
一般常用方法 1 2 3 4 5 6 7 8 9 10 11 12 13 14 15 16 17 18 19 20 21 22 23 24 25 26 27 28 29 30 31 32 33 34 35 36 37 38 39 40 41 42 43 44 45 46 47 48 49 50 51 52 53 54 55 56 57 58 59 60 61 62 63 64 65 66 67 68 69 70 71 72 73 74 75 76 77 78 79 80 81 82 83 84 85 86 87 88 89 90 91 92 93 94 95 96 97 98 99 100 101 102 103 104 105 106 107 package String;public class StringTest04 public static void main (String[] args) byte [] bytes = {97 ,98 ,99 }; String s1 = new String(bytes); System.out.println(s1); char [] char1 = {'你' ,'好' ,'世' ,'界' }; String s2 = new String(char1); System.out.println(char1); System.out.println(s2); String s3 = "hello世界" ; System.out.println(s3); char c = "你好世界" .charAt(2 ); System.out.println(c); System.out.println("abc" .compareTo("bcd" )); System.out.println("abc" .compareTo("abc" )); System.out.println("bac" .compareTo("abc" )); System.out.println("hello world java" .contains("java" )); System.out.println("hello.txt" .endsWith("txt" )); System.out.println("hello.java" .endsWith("txt" )); System.out.println("HelloWorld" .equalsIgnoreCase("helloWorld" )); byte [] bytes2 ="helloworld" .getBytes(); for (int i=0 ; i < bytes2.length;i++){ System.out.print(bytes2[i]+" " ); } System.out.println("java,php,c++" .indexOf("java" )); String s5 = "" ; System.out.println(s5.isEmpty()); System.out.println("hello" .length()); System.out.println("phphphpjavac++c++javascript" .lastIndexOf("java" )); System.out.println("hellojava" .replace("java" ,"javascript" )); System.out.println("java=java=java" .replace("=" ,":" )); String[] newString = "1998-1-1" .split("-" ); for (int i=0 ;i<newString.length;i++){ System.out.println(newString[i]); } System.out.println("http://www.baidu.com" .startsWith("http://" )); System.out.println("http://www.baidu.com" .substring(7 )); System.out.println("hellojavahh" .substring(5 ,9 )); char [] chars = "helloWorld" .toCharArray(); for (int i=0 ;i<chars.length;i++){ System.out.print(chars[i]+" " ); } System.out.println("HelLoeHshf" .toLowerCase()); System.out.println("HelohiihHy" .toUpperCase()); System.out.println(" hellojava php " .trim()); System.out.println(String.valueOf(3.14 )); } }
StringBuffer方法进行字符串拼接 在java中,字符串是不可变的,所以每一个拼接都会产生新字符串,会创建新字符串对象,占用大量的方法区内存。
所以使用StringBuffer来进行字符串拼接。
1 2 3 4 5 6 7 8 9 10 11 12 13 14 15 16 17 18 19 20 21 22 23 24 package String;public class StringTest05 public static void main (String[] args) StringBuffer stringbuffer1 = new StringBuffer(); stringbuffer1.append("a" ); stringbuffer1.append("b" ); stringbuffer1.append("c" ); stringbuffer1.append(true ); stringbuffer1.append("x" ); System.out.println(stringbuffer1); StringBuffer stringbuffer = new StringBuffer(100 ); } }
StringBuild和StringBuffer的区别 1 2 3 4 5 6 7 8 9 10 11 12 package String;public class StringTest06 public static void main (String[] args) StringBuilder sb = new StringBuilder(); sb.append(100 ); sb.append("hello" ); sb.append(true ); sb.append("ad" ); System.out.println(sb); } }
StringBuffer :StringBuffer中的方法都有synchronized关键字修饰。表示StringBuffer在多线程环境下运行是安全的。
StringBuilder :没有synchronized关键字修饰,所以StringBuffer在多线程环境下运行是不安全的。
包装类 java中为8种基本数据类型又对应准备了8种包装类型,8种包装类型属于引用数据类型,父类是Object。
例子:
1 2 3 4 5 6 7 8 9 10 11 12 13 14 15 16 17 18 19 20 21 22 23 24 25 26 27 28 29 30 package integer;public class IntegerTest01 public static void main (String[] args) Integer i = 100 ; MyInt m = new MyInt(12 ); doSome(m); doSome(i); } public static void doSome (Object obj) System.out.println(obj); } } class MyInt int value; public MyInt (int value) this .value=value; } @Override public String toString () return String.valueOf(value); } }
八种包装类都是什么?
基本数据类型
包装类型
byte
java.lang.Byte(父类Number)
short
java.lang.Short(父类Number)
int
java.lang.Integer(父类Number)
long
java.lang.Long(父类Number)
float
java.lang.Float(父类Number)
double
java.lang.Double(父类Number)
boolean
java.lang.Boolean(父类Object)
char
java.lang.Character(父类Object)
装箱和拆箱 :
1 2 3 4 5 6 7 8 9 10 11 12 13 14 15 16 17 package integer;public class IntegerTest02 public static void main (String[] args) Integer i = new Integer(123 ); float f = i.floatValue(); System.out.println(f); int value = i.intValue(); System.out.println(value); } }
Integer的构造方法:
1 2 Integer(int value); Integer(String s);
自动装箱和自动拆箱 1 2 3 4 5 6 7 8 9 10 11 12 13 14 15 16 17 18 19 package integer;public class IntegerTest03 public static void main (String[] args) Integer x = 100 ; int y = x; System.out.println(y); Integer z = 100 ; System.out.println(z+1 ); Integer a = 1000 ; Integer b = 1000 ; System.out.println(a==b); } }
String为什么不可变? 源代码种String类中有一个byte[]数组,这个byte[]数组采用了final修饰。
StringBuilder/StingBuffer为什么可变? 在源代码中,StringBuilder和StringBuffer内部是一个byte[]数组,这个数组没有被final修饰,初始化容量为16,当数组满了之后是会扩容的,底层调用了数组拷贝的方法进行扩容。
Integer面试题 1 2 3 4 5 6 7 8 9 10 11 12 13 14 15 16 17 18 package integer;public class IntegerTest04 public static void main (String[] args) Integer a = 128 ; Integer b = 128 ; System.out.println(a==b); Integer x = 127 ; Integer y = 127 ; System.out.println(x==y); } }
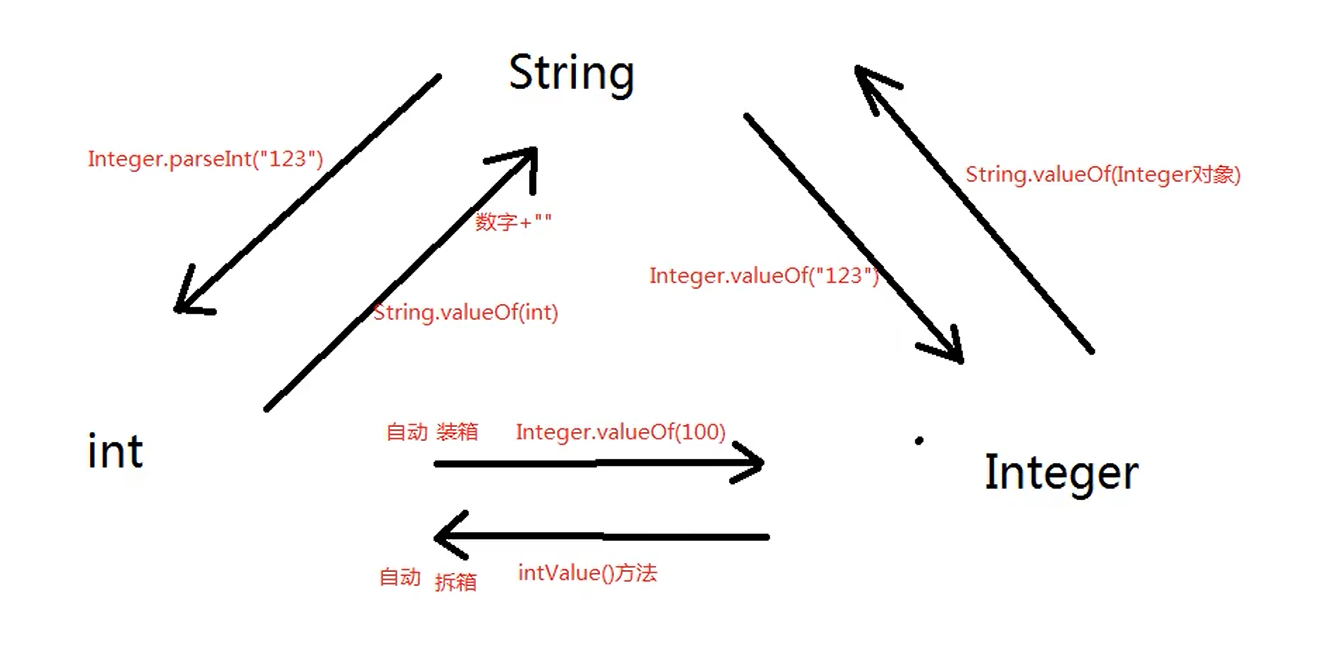
String int Integer类型互换: 1 2 3 4 5 6 7 8 9 10 11 12 13 14 15 16 17 18 19 20 21 22 23 24 25 26 27 package integer;public class IntegerTest05 public static void main (String[] args) int i1 = Integer.parseInt("100" ); System.out.println(i1+2 ); String s2 = i1 + "" ; System.out.println(s2+1 ); Integer x = 1000 ; int y = x; Integer k = Integer.valueOf("123" ); System.out.println(k); String s3 = String.valueOf(k); System.out.println(s3); } }
java对日期的处理 1 2 3 4 5 6 7 8 9 10 11 12 13 14 15 16 17 18 19 20 21 22 23 24 25 26 27 28 package chapter07;import java.text.SimpleDateFormat;import java.util.Date;public class DateTest01 public static void main (String[] args) throws Exception Date nowTime = new Date(); SimpleDateFormat s1 = new SimpleDateFormat("yyyy-MM-dd HH:mm:ss SSS" ); System.out.println(s1.format(nowTime)); String time = "2020-08-29 15:01:01 765" ; SimpleDateFormat s2 = new SimpleDateFormat("yyyy-MM-dd HH:mm:ss SSS" ); System.out.println(s2.parse(time)); } }
枚举 什么是枚举?
枚举是一种引用数据类型。
语法:
1 2 3 enum 枚举类型名{ 枚举值1 ,枚举值2 ...; }
代码案例:
1 2 3 4 5 6 7 8 9 10 11 12 13 14 15 16 17 18 19 20 21 22 23 24 package chapter07.Enum;public class EnumTest01 public static void main (String[] args) Result res = divide(1 ,2 ); System.out.println(res==Result.SUCCESS?"计算成功" :"计算失败" ); } public static Result divide (int a,int b) try { int c = a/b; return Result.SUCCESS; }catch (Exception e){ return Result.FAIL; } } enum Result{ SUCCESS,FAIL; } }
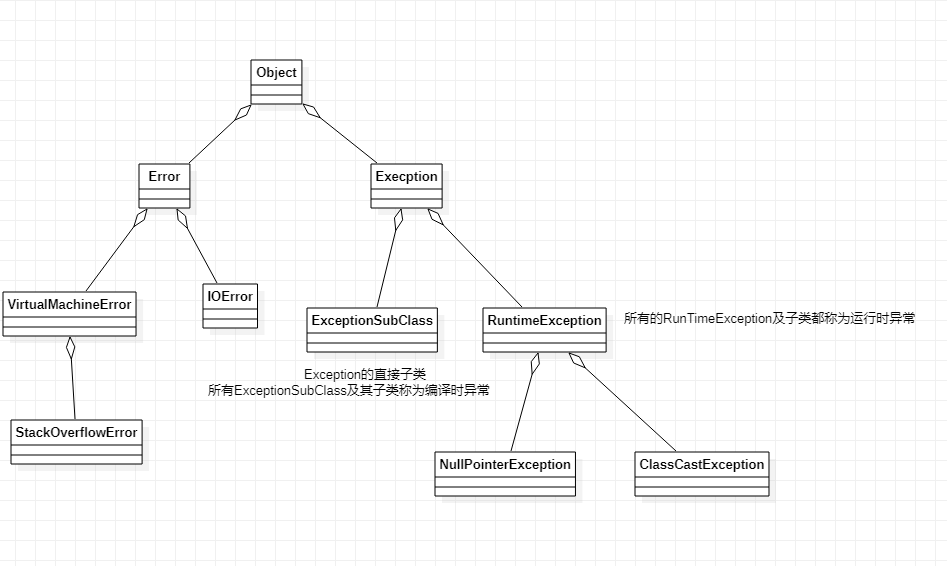
异常 异常在java中以类和对象的形式存在。
当我们的程序出现了问题的时候,JVM会new异常对象,并将new的异常对象抛出,打印输出到控制台。
异常有编译时异常(受检异常|受控异常)和运行时异常(非受检异常|非受控异常)。
编译时异常和运行时异常的区别 编译时异常必须在编译阶段预先处理,如果不处理编译器就会报错。而所以异常都是在运行阶段发生的。因为只有程序运行阶段才可以new对象。异常就是new异常对象的一个过程。
异常的两种处理方式
在方法声明的位置上,使用throws关键字(谁调用,抛给谁,这是由调用者来处理这个异常,调用者可使用try...catch解决异常或者继续往上抛)。
使用try...catch语句进行异常的捕捉
java中异常发生之后,如果选择了往上抛,最终抛给了main方法,main方法继续往上抛,抛给了JVM,于是就终止了程序的执行。
一般不抛给main方法,不然你不知道异常是什么。
需要处理的异常一般都是编译时异常。
运行时异常一般不需要处理。
案例:
1 2 3 4 5 6 7 8 9 10 11 12 13 14 15 16 17 18 19 20 21 22 23 24 25 26 27 28 29 30 31 32 33 34 35 36 37 38 39 40 41 42 43 44 package chapter08;import java.io.FileInputStream;import java.io.FileNotFoundException;public class ExceptionTest01 public static void main (String[] args) System.out.println("main begin" ); try { m2(); }catch (FileNotFoundException e){ System.out.println(e); } System.out.println("main over" ); } public static void m2 () throws FileNotFoundException System.out.println("m2 begin" ); m3(); System.out.println("m2 over" ); } public static void m3 () throws FileNotFoundException System.out.println("m3 begin" ); m4(); System.out.println("m4 over" ); } public static void m4 () throws FileNotFoundException System.out.println("m4 begin" ); new FileInputStream("D:\\blog\\hello.txt" ); System.out.println("m4 over" ); } }
catch可以说多个的,但是类型必须是从小到大这种。
在jdk8中可以使用逻辑或的方式把多个异常类型都写在一个catch括号里面。
开发中上报还是捕捉? 如果希望调用者来处理,则throws上报!
异常对象的常用方法 1 2 3 4 5 6 7 8 9 10 11 package chapter08;public class ExceptionTest02 public static void main (String[] args) NullPointerException e = new NullPointerException("空指针异常" ); System.out.println(e.getMessage()); e.printStackTrace(); } }
一般都是用printStackTrace()方法,方便我们追踪异常。
finally子句 finally子句中的代码是最后执行的,即使try语句块中出现了异常。
当代码抛出一个异常时,就会终止这个方法中剩余代码的处理,并退出这个方法的执行。如果方法获得了一些本地资源。并且只有这个方法自己知道,又如果这些资源在退出方法之前必须被回收,那么就会产生资源回收问题一种解决方案时捕获异常并重新抛出所有异常,但是这种方法比较乏味,这是因为需要在两个地方清除所分配的资源,一个在正常的代码中,一个在异常代码中。
finally通常用来完成资源的关闭释放。
try和finally可以在没有catch的时候使用。
自定义栈异常 1 2 3 4 5 6 7 8 9 10 11 12 13 14 15 16 17 18 19 20 21 22 23 24 25 26 27 28 29 30 31 32 33 34 35 36 37 38 39 40 41 42 43 44 45 46 47 48 49 50 51 52 53 54 55 56 57 58 59 60 61 62 63 64 65 66 67 68 69 70 71 72 73 74 75 76 77 78 79 package chapter08;public class ExceptionTest04 public static void main (String[] args) Mystack m = new Mystack(new Object[10 ]); try { m.push(new Object[]{new String("小明" )}); m.push(new Object[]{new String("小明" )}); m.push(new Object[]{new String("小明" )}); m.pop(); m.pop(); m.pop(); m.pop(); }catch (MyStackException e){ System.out.println(e.getMessage()); } System.out.println("当前栈内元素:" ); for (int i = 0 ; i < m.getElements().length; i++) { System.out.println(m.getElements()[i]); } } } class Mystack private Object[] elements; private int index = -1 ; public Mystack () this .elements = new Object[10 ]; } public Mystack (Object[] elements) this .elements = elements; } public void setElements (Object[] elements) this .elements = elements; } public Object[] getElements() { return elements; } public void setIndex (int index) this .index = index; } public int getIndex () return index; } public void push (Object[] elements) throws MyStackException if (this .index>=this .elements.length-1 ) { throw new MyStackException("压栈失败,栈已经满了" ); } this .index++; this .elements[this .index] = elements; System.out.println("压栈成功,压入元素" +elements+"栈帧指向" +this .index); } public void pop () throws MyStackException if (this .index<0 ) { throw new MyStackException("弹栈失败,栈已经空了" ); } this .elements[this .index] = null ; this .index--; System.out.println("弹栈成功,栈帧指向" +this .index); } } class MyStackException extends Exception public MyStackException () super (); } public MyStackException (String s) super (s); } }
异常与方法覆盖 重写之后的方法不能比重写之前的方法抛出更多的异常,可以更少。
总结异常中的关键字 异常捕捉:
1 2 3 4 5 6 7 try { }catch { }finally { }
throws:在方法声明的位置上使用,表示上报异常给调用者。
throw:手动抛出异常。
集合 什么是集合? 集合是一个容器,是一个载体,可以容纳多个对象。
集合不能直接存储基本能数据类型,集合中存储的是引用。
在java中每一个集合,底层都对应着不同的数据结构。往不同的集合中存储元素,等于将数据放到了不同的数据结构当中。数据结构有:数组、二叉树、链表、哈希表...
在java中集合分为两大类:
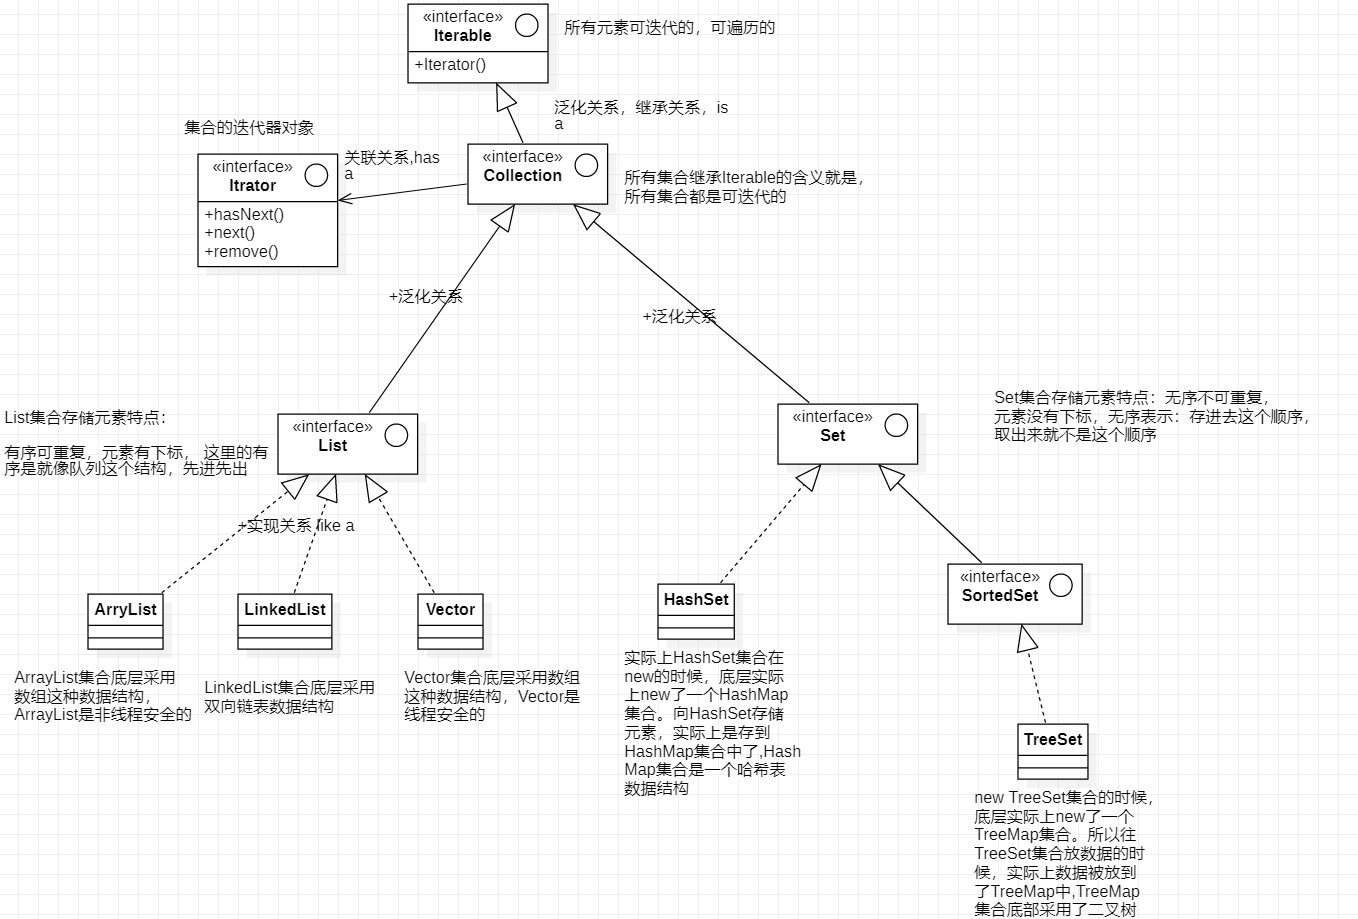
集合的继承结构图
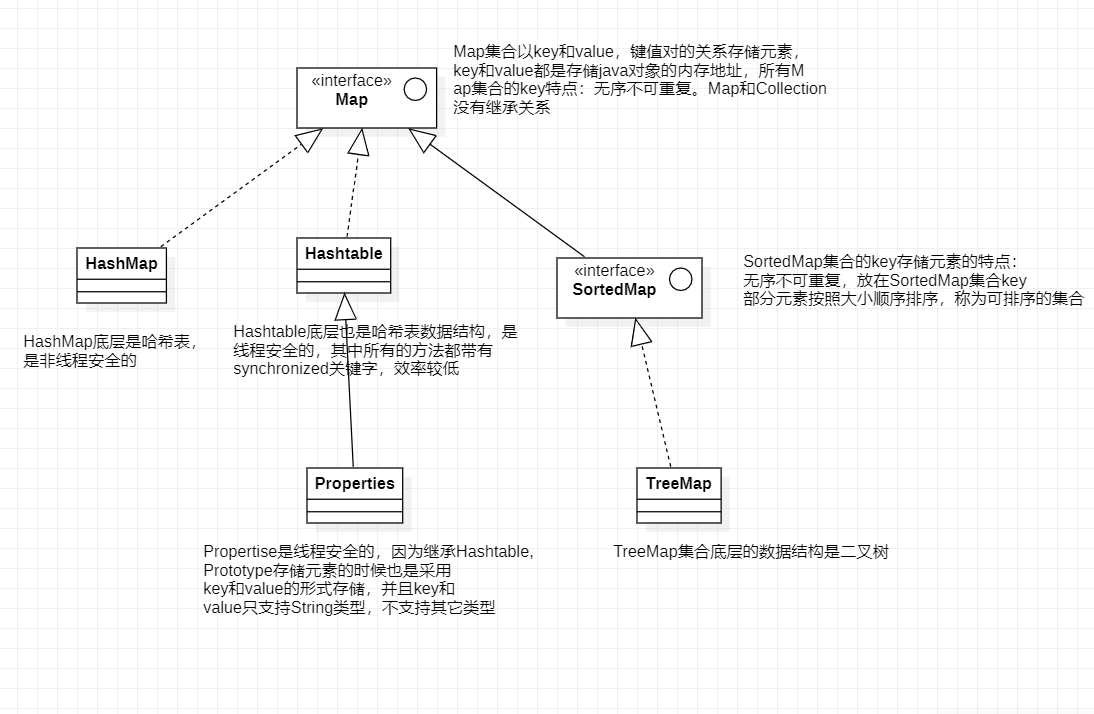
Map继承结构图
List、Set、Sorted存储元素的特点 List集合存储元素的特点:
Set集合存储元素的特点:
SortedSet集合存储元素的特点:
无序不可重复,但是SortedSet集合中的元素是可排列的。
可排序:可以按照大小顺序排列。
Map集合中的key就是一个Set集合。
Collection接口常用方法 没有使用泛型之前,Collection中可存储Object的所有子类型。
1 2 3 4 5 6 7 8 9 10 11 12 13 14 15 16 17 18 19 20 21 22 23 24 25 26 27 28 29 30 31 32 33 34 35 36 37 38 39 40 41 42 43 package chapter09;import java.util.ArrayDeque;import java.util.ArrayList;import java.util.Collection;public class CollectionTest01 public static void main (String[] args) Collection c1 = new ArrayList(); c1.add(1200 ); c1.add(3.14 ); c1.add(new Student()); c1.add(new Object()); System.out.println("集合中元素的个数是:" +c1.size()); System.out.println(c1.contains(1200 )); Object[] arrs = c1.toArray(); for (int i=0 ;i<arrs.length;i++){ System.out.println(arrs[i]); } } } class Student }
contains方法
底层调用了被重写了的equals方法。
1 2 3 4 5 6 7 8 9 10 11 12 13 14 15 16 17 18 19 20 21 22 23 24 package chapter09;import java.util.ArrayList;import java.util.Collection;public class CollectionTest04 public static void main (String[] args) Collection c = new ArrayList(); String s1 = new String("abc" ); c.add(s1); String s2 = new String("def" ); c.add(s2); System.out.println("集合中元素的个数:" +c.size()); String x = new String("abc" ); System.out.println(c.contains(x)); } }
remove()方法
底层也调用了equals()方法。但是没有重写。
在集合迭代过程中,当集合的结构发生变化的时候,就得重新去获取迭代器,所以在集合迭代的过程中,不能使用remove()方法。
如果要删除的话只能用迭代器中的remove()方法。
迭代集合的原理 在集合迭代过程中,当集合的结构发生变化的时候,就得重新去获取迭代器,所以在迭代过程中删除元素,要使用迭代器中的remove()方法去删除元素,而不是使用集合中的remove()方法
boolean hasNext() 如果仍然有元素可以迭代,则返回true
Object next() 返回迭代中的下一个元素
1 2 3 4 5 6 7 8 9 10 11 12 13 14 15 16 17 18 19 20 21 22 23 24 25 26 27 28 package chapter09;import java.util.ArrayList;import java.util.Collection;import java.util.Iterator;public class CollectionTest02 public static void main (String[] args) Collection c = new ArrayList(); c.add("123" ); c.add("hello world" ); c.add(456 ); c.add(new Object()); Iterator it = c.iterator(); while (it.hasNext()){ Object obj = it.next(); System.out.print(obj+" " ); } } }
上述代码说明了ArrayList集合有序可重复。
1 2 3 4 5 6 7 8 9 10 11 12 13 14 15 16 17 18 19 20 21 22 package chapter09;import java.util.Collection;import java.util.HashSet;import java.util.Iterator;public class CollectionTest03 public static void main (String[] args) Collection c = new HashSet(); c.add(100 ); c.add(200 ); c.add(60 ); c.add(100 ); c.add(120 ); c.add(200 ); Iterator it = c.iterator(); while (it.hasNext()){ System.out.print(it.next()+" " ); } } }
证明HashSet集合无序不可重复。
List接口特有的方法 1 2 3 4 5 6 7 8 9 10 11 12 13 14 15 16 17 18 19 20 21 22 23 24 25 26 27 28 29 30 31 32 33 34 35 36 37 38 39 40 41 42 43 44 45 46 47 48 49 50 51 52 53 54 55 56 57 58 59 60 61 package chapter09;import java.util.ArrayList;import java.util.Iterator;import java.util.List;public class ListTest01 public static void main (String[] args) List myList = new ArrayList(); myList.add("a" ); myList.add("b" ); myList.add("c" ); myList.add("d" ); myList.add(1 ,"hello" ); Iterator it = myList.iterator(); while (it.hasNext()){ Object o = it.next(); System.out.println(o); } for (int i=0 ;i<myList.size();i++){ Object obj = myList.get(i); System.out.println(obj); } int i = myList.indexOf("hello" ); System.out.println(i); System.out.println("----------------" ); System.out.println(myList.size()); myList.remove(1 ); System.out.println(myList.size()); myList.set(0 ,"soft" ); Iterator it2 = myList.iterator(); while (it2.hasNext()){ System.out.print(it2.next()+" " ); } } }
ArrayList 1 2 3 4 5 6 7 8 9 10 11 12 13 14 15 16 17 18 19 20 21 22 23 24 25 26 27 28 29 30 31 32 33 package chapter09;import java.util.ArrayList;import java.util.Collection;import java.util.HashSet;import java.util.List;public class ArrayListTest01 public static void main (String[] args) List myList1 = new ArrayList(); List myList2 = new ArrayList(100 ); Collection c = new HashSet(); c.add(100 ); c.add(500 ); c.add(400 ); c.add(300 ); c.add(200 ); List myList3 = new ArrayList(c); for (int i=0 ;i<myList3.size();i++){ System.out.println(myList3.get(i)); } } }
LinkedList 链表优点 :随机增删元素效率高,不涉及大量元素位移。
链表缺点 :查询效率低,每一次查找某个元素的时候,都要从头结点开始往下遍历。
1 2 3 4 5 6 7 8 9 10 11 12 13 14 15 16 17 18 19 20 21 package chapter09;import java.util.Collection;import java.util.LinkedList;import java.util.List;public class LinkedListTest01 public static void main (String[] args) List list = new LinkedList(); list.add("a" ); list.add("b" ); list.add("c" ); for (int i=0 ;i<list.size();i++){ Object obj = list.get(i); System.out.println(obj); } } }
泛型机制 泛型用来指定集合中存储的数据类型。
E是Element。
T是Type。
使用泛型的好处是:
集合中存储的元素统一了。
从集合中取出的元素类型是泛型指定的类型,不需要进行大量的向下转型
语法:
1 List<Animal> myList = new ArrayList<Animal>();
泛型的缺点:
1 2 3 4 5 6 7 8 9 10 11 12 13 14 15 16 17 18 19 20 21 22 23 24 25 26 27 28 29 30 31 32 33 34 35 36 37 38 39 40 41 42 43 44 45 46 47 48 49 50 package chapter09;import java.util.ArrayList;import java.util.Iterator;import java.util.List;public class GenericTest01 public static void main (String[] args) List<Animal> myList = new ArrayList<>(); Animal animal = new Animal(); Bird bird = new Bird(); Cat cat = new Cat(); myList.add(animal); myList.add(bird); myList.add(cat); Iterator<Animal> it = myList.iterator(); while (it.hasNext()){ Animal animal1 = it.next(); if (animal1 instanceof Cat){ Cat cat1 = (Cat)animal1; cat1.catchMouse(); }else if (animal1 instanceof Bird){ Bird bird1 = (Bird)animal1; bird1.fly(); } } } } class Animal public void move () System.out.println("动物在移动" ); } } class Bird extends Animal public void fly () System.out.println("鸟儿在飞侠" ); } } class Cat extends Animal public void catchMouse () System.out.println("猫抓老鼠" ); } }
自定义泛型
1 2 3 4 5 6 7 8 9 10 11 12 13 14 15 16 17 18 19 20 21 22 23 24 25 26 package chapter09;public class GenericTest02 public static void main (String[] args) Test<String> test = new Test<>(); test.word("hello world" ); Test2<Animal> test2 = new Test2<>(); Animal a = test2.get(); } } class Test <String > public void word (String s) System.out.println(s); } } class Test2 <T > public T get () return null ; } }
HashSet HashSet集合无序不可重复。
1 2 3 4 5 6 7 8 9 10 11 12 13 14 15 16 17 18 19 20 21 package chapter09;import java.util.Set;import java.util.TreeSet;public class TreeSetTest01 public static void main (String[] args) Set<Integer> mySet = new TreeSet<>(); mySet.add(15 ); mySet.add(133 ); mySet.add(123 ); mySet.add(23 ); mySet.add(13 ); mySet.add(12 ); for (Integer i : mySet){ System.out.println(i); } } }
Map接口常用方法 1 2 3 4 5 6 7 8 9 10 11 12 13 14 15 16 17 18 19 20 21 22 23 24 25 26 27 28 29 30 31 32 33 34 35 36 37 38 39 40 41 42 43 44 45 46 47 48 49 50 51 52 53 54 55 56 57 58 59 60 61 62 63 64 package chapter10;import java.util.Collection;import java.util.HashMap;import java.util.Map;public class Maptest01 public static void main (String[] args) Map<Integer,String> map = new HashMap<>(); map.put(1 ,"张三" ); map.put(2 ,"王三" ); map.put(3 ,"四三" ); map.put(4 ,"王三" ); map.put(5 ,"李三" ); String value1 = map.get(1 ); System.out.println(value1); System.out.println(map.size()); map.remove(1 ); System.out.println(map.size()); System.out.println(map.containsKey(4 )); System.out.println(map.containsKey(6 )); System.out.println(map.containsValue("李三" )); Collection<String> values = map.values(); for (String s:values){ System.out.print(s+" " ); } map.clear(); System.out.println(map.size()); } }
1 2 3 4 5 6 7 8 9 10 11 12 13 14 15 16 17 18 19 20 21 22 23 24 25 26 27 28 29 30 31 32 33 34 35 36 37 38 39 package chapter10;import java.util.HashMap;import java.util.Iterator;import java.util.Map;import java.util.Set;public class MapTest02 public static void main (String[] args) Map<Integer,String> map = new HashMap<>(); map.put(1 ,"张三" ); map.put(2 ,"李四" ); map.put(3 ,"王五" ); map.put(4 ,"java" ); Set<Integer> keys = map.keySet(); Iterator<Integer> it = keys.iterator(); while (it.hasNext()){ Integer key = it.next(); String value = map.get(key); System.out.println(key+"=" +value); } Set<Map.Entry<Integer,String>> set = map.entrySet(); Iterator<Map.Entry<Integer,String>> it2 = set.iterator(); while (it2.hasNext()){ Map.Entry<Integer,String> node = it2.next(); Integer key = node.getKey(); String value = node.getValue(); System.out.println(key+"=" +value); } } }
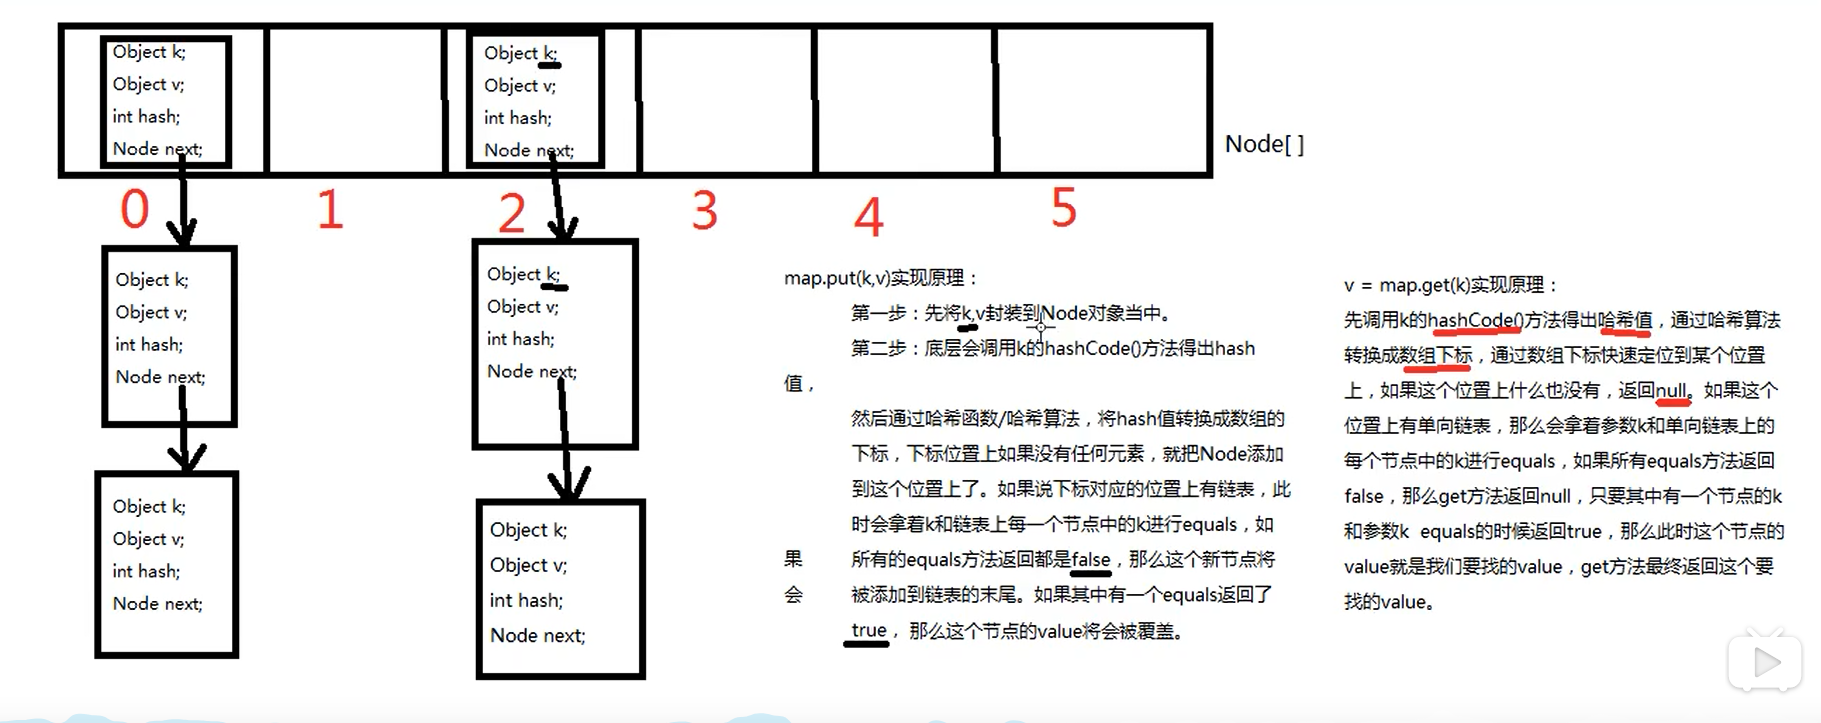
哈希表数据结构
HashMap集合中的key会先后调用两个方法:一个是hashCode()方法,一个是equals()方法,所以这两个方法都需要重写 。
HashMap集合中的key的特点是无序不可重复。
无序:因为新添加的元素不一定添加在哪个单链表上。
不可重复:因为equals方法用来保证hashMap的集合的key不可重复。
同一个单向链表上同一个结点的hash值一样。但同一个链表上的k都不相等。
HashMap集合初始化容量必须是2的倍数,这是因为达到散列均匀,为了提高HashMap集合的存储效率。
对于哈希表数据结构来说:如果两个对象的hash值相同,一定是放到同一个单向链表上。
如果两个对象的hash值不相同,但是由于哈希算法执行结束后转化的数组下标可能相同,所以会发生哈希碰撞 。
HashMap和HashTable区别: HashMap集合的key和value不允许为null。
HashTable集合的key和value不允许为null。
HashMap集合的默认初始化容量是16,默认加载因子是0.75。
HashTable集合的初始化容量为11,扩容为:原容量*2+1。
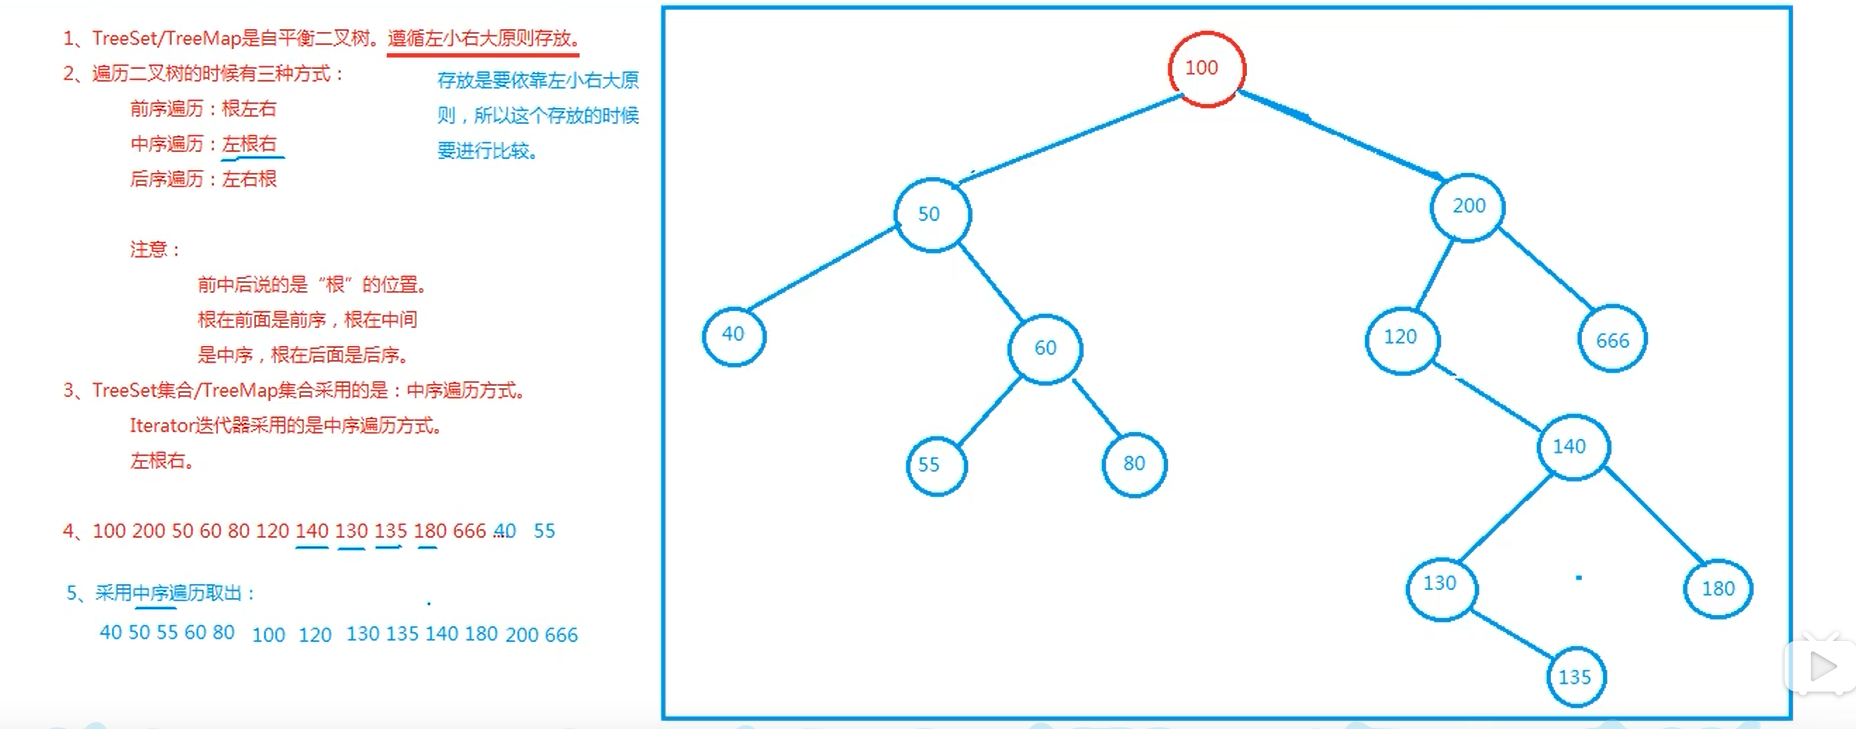
自定义comparable接口进行排序 1 2 3 4 5 6 7 8 9 10 11 12 13 14 15 16 17 18 19 20 21 22 23 24 25 26 27 28 29 30 31 32 33 34 35 36 37 38 39 40 41 42 43 44 45 46 47 48 49 50 51 52 53 54 55 56 57 58 59 60 61 62 63 64 65 66 67 68 package chapter10;import java.util.TreeSet;public class TreeSetTest02 public static void main (String[] args) Person p1 = new Person(12 ,"xiaohonghong" ); Person p2 = new Person(12 ,"xiaohuihui" ); Person p3 = new Person(11 ,"xiaolizi" ); Person p4 = new Person(15 ,"wangwu" ); TreeSet<Person> ts = new TreeSet<>(); ts.add(p1); ts.add(p2); ts.add(p3); ts.add(p4); for (Person p : ts){ System.out.println(p); } } } class Person implements Comparable <Person > int age; String name; public Person () } public Person (int age,String name) this .age = age; this .name = name; } @Override public int compareTo (Person p) if (this .age == p.age){ return this .name.compareTo(p.name); }else { return this .age - p.age; } } @Override public String toString () return "Person{" + "age=" + age + ", name='" + name + '\'' + '}' ; } }
平衡二叉树数据结构
使用比较器的方式进行排序 1 2 3 4 5 6 7 8 9 10 11 12 13 14 15 16 17 18 19 20 21 22 23 24 25 26 27 28 29 30 31 32 33 34 35 36 37 38 39 40 41 42 43 44 45 46 47 48 49 50 51 52 package chapter10;import java.util.Comparator;import java.util.TreeSet;public class TreeSetTest03 public static void main (String[] args) TreeSet<Animal> ts = new TreeSet<>(new AnimalComparator()); Animal a1 = new Animal(18 ); Animal a2 = new Animal(20 ); Animal a3 = new Animal(17 ); Animal a4 = new Animal(11 ); ts.add(a1); ts.add(a2); ts.add(a3); ts.add(a4); for (Animal a : ts){ System.out.println(a); } } } class Animal int age; public Animal () } public Animal (int age) this .age = age; } @Override public String toString () return "Animal{" + "age=" + age + '}' ; } } class AnimalComparator implements Comparator <Animal > @Override public int compare (Animal o1, Animal o2) return o1.age - o2.age; } }
1 2 3 4 5 6 7 8 9 10 11 12 13 14 15 16 17 18 19 20 21 22 23 24 25 26 27 28 29 30 31 32 33 34 35 36 37 38 39 40 41 42 43 44 45 46 47 48 package chapter10;import java.util.Comparator;import java.util.TreeSet;public class TreeSetTest05 public static void main (String[] args) TreeSet<Student> ts = new TreeSet<>(new Comparator<Student>() { @Override public int compare (Student o1, Student o2) return o1.age - o2.age; } }); ts.add(new Student("小明" ,12 )); ts.add(new Student("小张" ,123 )); ts.add(new Student("小离" ,120 )); ts.add(new Student("小怕" ,1 )); ts.add(new Student("小拍" ,11 )); for (Student s : ts){ System.out.println(s); } } } class Student String name; int age; public Student () } public Student (String name,int age) this .name = name; this .age = age; } @Override public String toString () return "Student{" + "name='" + name + '\'' + ", age=" + age + '}' ; } }
放到TreeSet或者TreeMap集合key部分的元素想要做到排序:
自定义comparable接口进行排序
使用比较器进行排序
如果比较规则有多个的时候就是用比较器,如果比较规则少的时候就自定义comparable接口。
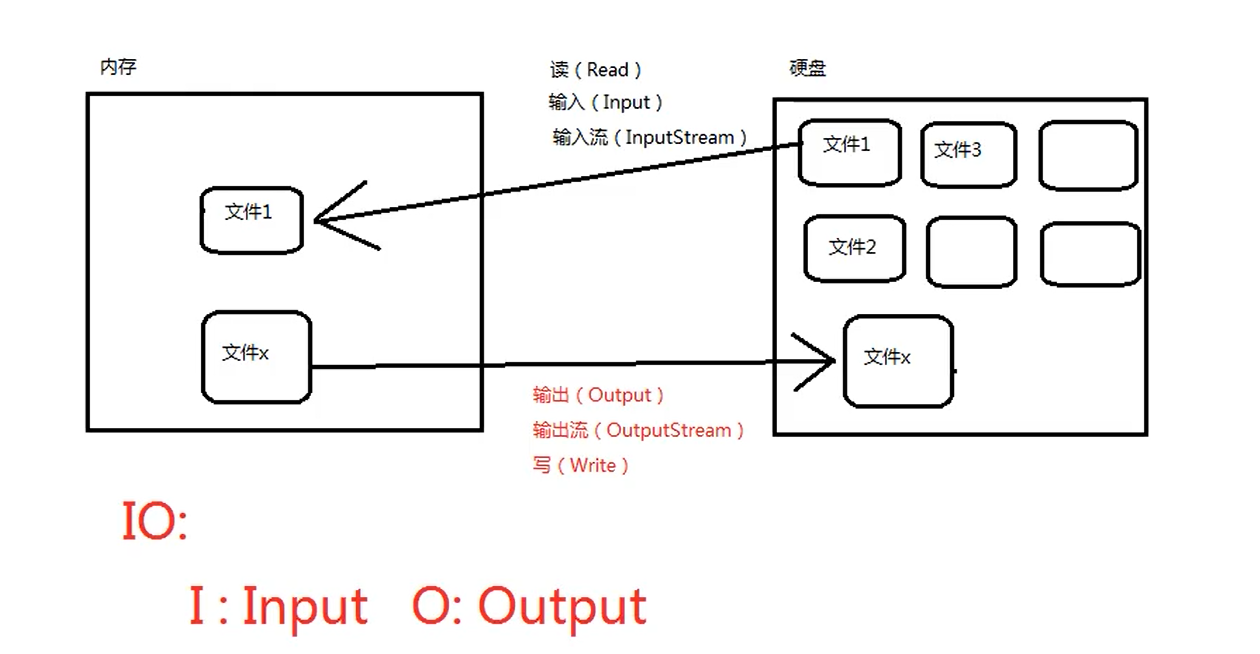
IO流 通过IO(Input Output)流可以完成硬盘文件的读和写。
IO流的分类
按照流的方向进行分类,内存作为参照物:
往内存中去,叫输入(Input),或叫读(Read)。
从内存中出来,叫做输出(Output),或者叫写(Write)。
按照字节的方式读取数据,一次读取一个字节byte,等同于一次读取8个二进制位。
按照字符的方式读取数据。
流的四大家族 1 2 3 4 java.io.InputStream java.io.OutputStream java.io.Reader java.io.Writer
四大家族都是抽象类。
所有的流都是可关闭的。
所有的流 都实现了java.io.Closeable接口,都是可关闭的,都有close()方法。用完流都需要关闭,不然会消耗资源。
所有的输出流 都实现了java.io.Flushable接口,都是可刷新的,都有flush()方法。
java.io包下需要掌握的流有16个:
1 2 3 4 5 6 7 8 9 10 11 12 13 14 15 16 17 18 19 20 21 22 23 24 25 26 27 28 29 java.io.FileInputStream java.io.FileOutputStream java.io.FileReader java.io.FileWriter java.io.InputStreamReader java.io.OutputStreamWriter java.io.BufferedReader java.io.BufferedWriter java.io.BufferedInputStream java.io.BufferedOutputStream java.io.DataInputStream java.io.DataOutputStream java.io.PrintWriter java.io.PrintStream java.io.ObjectInputStream java.io.ObjectOutputStream
1 2 3 4 5 6 7 8 9 10 11 12 13 14 15 16 17 18 19 20 21 22 23 24 25 26 27 28 29 30 31 32 33 34 35 36 37 38 39 40 41 42 43 44 45 46 47 48 49 50 51 52 package IO;import java.io.FileInputStream;import java.io.FileNotFoundException;import java.io.IOException;public class FileInputStreamTest02 public static void main (String[] args) FileInputStream fis = null ; try { fis = new FileInputStream("src/IO/123.text" ); byte [] bytes = new byte [4 ]; int readCount = fis.read(bytes); System.out.println(readCount); System.out.println(new String(bytes,0 ,readCount)); readCount = fis.read(bytes); System.out.println(readCount); System.out.println(new String(bytes,0 ,readCount)); readCount = fis.read(bytes); System.out.println(readCount); System.out.println(new String(bytes,0 ,readCount)); readCount = fis.read(bytes); System.out.println(readCount); } catch (FileNotFoundException e) { e.printStackTrace(); } catch (IOException e) { e.printStackTrace(); } finally { if (fis != null ){ try { fis.close(); } catch (IOException e) { e.printStackTrace(); } } } } }
修改版:
1 2 3 4 5 6 7 8 9 10 11 12 13 14 15 16 17 18 19 20 21 22 23 24 25 26 27 28 29 30 31 32 33 34 35 package IO;import java.io.FileInputStream;import java.io.FileNotFoundException;import java.io.IOException;public class FileInputStreamTest03 public static void main (String[] args) FileInputStream fis = null ; try { fis = new FileInputStream("src/IO/123.text" ); byte [] bytes = new byte [4 ]; int readCount = 0 ; while ((readCount = fis.read(bytes)) != -1 ){ System.out.println(new String(bytes,0 ,readCount)); } } catch (FileNotFoundException e) { e.printStackTrace(); } catch (IOException e) { e.printStackTrace(); } finally { if (fis != null ){ try { fis.close(); } catch (IOException e) { e.printStackTrace(); } } } } }
available()方法1 2 3 4 5 6 7 8 9 10 11 12 13 14 15 16 17 18 19 20 21 22 23 24 25 26 27 28 package IO;import java.io.FileInputStream;import java.io.FileNotFoundException;import java.io.IOException;public class FileInputStreamTest04 public static void main (String[] args) FileInputStream fis = null ; try { fis = new FileInputStream("src/IO/123.text" ); System.out.println("总字节数量:" +fis.available()); byte [] bytes = new byte [fis.available()]; int readCount = fis.read(bytes); System.out.println(new String(bytes)); } catch (FileNotFoundException e) { e.printStackTrace(); } catch (IOException e) { e.printStackTrace(); } } }
FileOutputStream 1 2 3 4 5 6 7 8 9 10 11 12 13 14 15 16 17 18 19 20 21 22 23 24 25 26 27 28 29 30 31 32 33 34 35 package IO;import java.io.FileNotFoundException;import java.io.FileOutputStream;import java.io.IOException;public class FileOutputStreamTest01 public static void main (String[] args) FileOutputStream fis = null ; try { fis = new FileOutputStream("src/IO/hello.text" ,true ); byte [] bytes = {97 ,98 ,99 ,100 }; fis.write(bytes); String s = "你好,java" ; byte [] bytes2 = s.getBytes(); fis.write(bytes2); fis.flush(); } catch (FileNotFoundException e) { e.printStackTrace(); } catch (IOException e) { e.printStackTrace(); } } }
文件复制原理 文件拷贝的过程就是:一边读一边写的过程。内存是中间商一样。
1 2 3 4 5 6 7 8 9 10 11 12 13 14 15 16 17 18 19 20 21 22 23 24 25 26 27 28 29 30 31 32 33 34 35 36 37 38 39 40 41 42 43 44 45 46 47 48 49 package IO;import java.io.FileInputStream;import java.io.FileNotFoundException;import java.io.FileOutputStream;import java.io.IOException;public class FileCopyTest01 public static void main (String[] args) FileInputStream fis = null ; FileOutputStream fos = null ; try { fis = new FileInputStream("src/IO/123.text" ); fos = new FileOutputStream("src/String/123.text" ); byte [] bytes = new byte [1024 *1024 ]; int readCount =0 ; while ((readCount = fis.read(bytes)) != -1 ){ fos.write(bytes,0 ,readCount); } fos.flush(); } catch (FileNotFoundException e) { e.printStackTrace(); } catch (IOException e) { e.printStackTrace(); } finally { if (fis != null ){ try { fis.close(); } catch (IOException e) { e.printStackTrace(); } } if (fos != null ){ try { fos.close(); } catch (IOException e) { e.printStackTrace(); } } } } }
FileReader 1 2 3 4 5 6 7 8 9 10 11 12 13 14 15 16 17 18 19 20 21 22 23 24 25 package IO;import java.io.FileNotFoundException;import java.io.FileReader;import java.io.IOException;public class FileReaderTest01 public static void main (String[] args) FileReader reader = null ; try { reader = new FileReader("src/IO/123.text" ); char [] chars = new char [4 ]; int readCount = 0 ; while ((readCount = reader.read(chars)) != -1 ){ System.out.println(new String(chars,0 ,readCount)); } } catch (FileNotFoundException e) { e.printStackTrace(); } catch (IOException e) { e.printStackTrace(); } } }
FileWriter 1 2 3 4 5 6 7 8 9 10 11 12 13 14 15 16 17 18 19 20 21 package IO;import java.io.FileWriter;import java.io.IOException;public class FileWriterTest01 public static void main (String[] args) FileWriter writer = null ; try { writer = new FileWriter("src/IO/helloJava.text" ); char [] chars = {'你' ,'好' }; writer.write(chars); writer.write("\n" ); writer.write("hello world" ); writer.flush(); } catch (IOException e) { e.printStackTrace(); } } }
BufferedReader 1 2 3 4 5 6 7 8 9 10 11 12 13 14 15 16 17 18 19 20 21 22 23 24 25 26 27 28 29 30 31 32 33 34 package IO;import java.io.BufferedReader;import java.io.FileNotFoundException;import java.io.FileReader;import java.io.IOException;public class BufferedReaderTest01 public static void main (String[] args) FileReader fr = null ; try { fr = new FileReader("src/IO/FileCopyTest01.java" ); BufferedReader br = new BufferedReader(fr); String s = null ; while ((s = br.readLine()) != null ){ System.out.println(s); } } catch (FileNotFoundException e) { e.printStackTrace(); } catch (IOException e) { e.printStackTrace(); } } }
转化流 1 2 3 4 5 6 7 8 9 10 11 12 13 14 15 16 17 18 19 20 21 22 23 24 package IO;import java.io.BufferedReader;import java.io.FileInputStream;import java.io.InputStreamReader;public class StreamTransformTest01 public static void main (String[] args) throws Exception FileInputStream in = new FileInputStream("src/IO/hellojava.text" ); InputStreamReader reader = new InputStreamReader(in); BufferedReader br = new BufferedReader(reader); String line = null ; while ((line = br.readLine()) != null ){ System.out.println(line); } br.close(); } }
BufferedWriter 1 2 3 4 5 6 7 8 9 10 11 12 13 14 15 16 17 18 19 package IO;import java.io.*;public class BufferedWriterTest01 public static void main (String[] args) throws Exception BufferedWriter out = new BufferedWriter(new OutputStreamWriter(new FileOutputStream("src/IO/456.text" ))); out.write("hello world" ); out.write("\n" ); out.write("你好" ); out.flush(); out.close(); } }
数据流 DataOutputStream 1 2 3 4 5 6 7 8 9 10 11 12 13 14 15 16 17 18 19 20 21 22 23 24 25 26 27 28 29 30 31 32 33 34 35 36 37 38 39 40 41 package IO;import java.io.DataOutputStream;import java.io.FileOutputStream;public class DataOutputStreamTest01 public static void main (String[] args) throws Exception DataOutputStream dos = new DataOutputStream(new FileOutputStream("src/IO/data.text" )); byte b = 100 ; short s = 200 ; int i = 300 ; long l =400L ; float f = 3.0F ; double d = 3.14 ; boolean sex = false ; char c = 'a' ; dos.writeByte(b); dos.writeShort(s); dos.writeInt(i); dos.writeLong(l); dos.writeFloat(f); dos.writeDouble(d); dos.writeBoolean(sex); dos.writeChar(c); dos.flush(); dos.close(); } }
1 2 3 4 5 6 7 8 9 10 11 12 13 14 15 16 17 18 19 20 21 22 23 24 25 26 27 28 29 30 31 32 33 34 35 36 37 package IO;import java.io.DataInputStream;import java.io.FileInputStream;public class DataInputStreamTest01 public static void main (String[] args) throws Exception DataInputStream dis = new DataInputStream(new FileInputStream("src/IO/data.text" )); byte b = dis.readByte(); short s = dis.readShort(); int i = dis.readInt(); long l = dis.readLong(); float f = dis.readFloat(); double d = dis.readDouble(); boolean sex = dis.readBoolean(); char c = dis.readChar(); System.out.println(b); System.out.println(s); System.out.println(i); System.out.println(l); System.out.println(f); System.out.println(d); System.out.println(sex); System.out.println(c); dis.close(); } }
标准输出流 1 2 3 4 5 6 7 8 9 10 11 12 13 14 15 16 17 18 19 20 21 22 23 24 25 26 package IO.log;import java.io.FileNotFoundException;import java.io.FileOutputStream;import java.io.PrintStream;import java.text.SimpleDateFormat;import java.util.Date;public class Logger public static void log (String msg) try { PrintStream out = new PrintStream(new FileOutputStream("src/IO/log/log.text" ,true )); System.setOut(out); Date nowTime = new Date(); SimpleDateFormat sdf = new SimpleDateFormat("yyyy-MM-dd HH:mm:ss SSS" ); String strTime = sdf.format(nowTime); System.out.println(strTime+":" +msg); } catch (FileNotFoundException e) { e.printStackTrace(); } } }
进行测试:
1 2 3 4 5 6 7 8 9 10 package IO.log;public class Test public static void main (String[] args) Logger.log("调用了System类的gc()方法" ); Logger.log("调用了System类的gc()方法" ); Logger.log("调用了System类的gc()方法" ); Logger.log("调用了System类的gc()方法" ); } }
File 1 2 3 4 5 6 7 8 9 10 11 12 13 14 15 16 17 18 19 20 21 22 23 24 25 26 27 28 29 30 package IO.File;import java.io.File;public class FileTest01 public static void main (String[] args) throws Exception File f1 = new File("D:/hello" ); if (!f1.exists()){ f1.mkdir(); } File f2 = new File("D:/hello.text" ); if (!f1.exists()){ f1.createNewFile(); } File f3 = new File("F:\\PPT\\01 网络基础课程\\第1册-第1章-网络纵横.pptx" ); String parentPath = f3.getParent(); System.out.println(parentPath); File f4 = new File("123.text" ); System.out.println("绝对路径是:" +f4.getAbsolutePath()); } }
1 2 3 4 5 6 7 8 9 10 11 12 13 14 15 16 17 18 19 20 21 22 23 24 25 26 27 28 29 package IO.File;import java.io.File;import java.text.SimpleDateFormat;import java.util.Date;public class FileTest02 public static void main (String[] args) File f1 = new File("src/IO/123.text" ); System.out.println(f1.getName()); System.out.println(f1.isDirectory()); System.out.println(f1.isFile()); long haoMiao = f1.lastModified(); Date time = new Date(haoMiao); SimpleDateFormat sdf = new SimpleDateFormat("yyyy-MM-dd HH:mm:ss SSS" ); String strTime = sdf.format(time); System.out.println(strTime); System.out.println(f1.length()); } }
拷贝整个目录作业 1 2 3 4 5 6 7 8 9 10 11 12 13 14 15 16 17 18 19 20 21 22 23 24 25 26 27 28 29 30 31 32 33 34 35 36 37 38 39 40 41 42 43 44 45 46 47 48 49 50 51 52 53 54 55 56 57 58 59 60 61 62 63 64 65 66 67 68 69 70 71 package IO.homeWork;import java.io.*;public class CopyAll public static void main (String[] args) File srcFile = new File("F:\\PPT" ); File desFile = new File("E:\\" ); copyDir(srcFile,desFile); } private static void copyDir (File srcFile, File destFile) if (srcFile.isFile()){ FileInputStream in = null ; FileOutputStream out = null ; try { in = new FileInputStream(srcFile); String path = (destFile.getAbsolutePath().endsWith("\\" )?destFile.getAbsolutePath():destFile.getAbsolutePath()+"\\" )+srcFile.getAbsolutePath().substring(3 ); out = new FileOutputStream(path); byte [] bytes = new byte [1024 *1024 ]; int readCount = 0 ; while ((readCount = in.read(bytes)) != -1 ){ out.write(bytes,0 ,readCount); } out.flush(); } catch (FileNotFoundException e) { e.printStackTrace(); } catch (IOException e) { e.printStackTrace(); } finally { if (out != null ){ try { out.close(); } catch (IOException e) { e.printStackTrace(); } } if (in != null ){ try { in.close(); } catch (IOException e) { e.printStackTrace(); } } } return ; } File[] files = srcFile.listFiles(); for (File file : files){ if (file.isDirectory()){ String srcDir = file.getAbsolutePath(); String destDir = (destFile.getAbsolutePath().endsWith("\\" )?destFile.getAbsolutePath():destFile.getAbsolutePath()+"\\" )+srcDir.substring(3 ); File newFile = new File(destDir); if (!newFile.exists()){ newFile.mkdirs(); } } copyDir(file,destFile); } } }
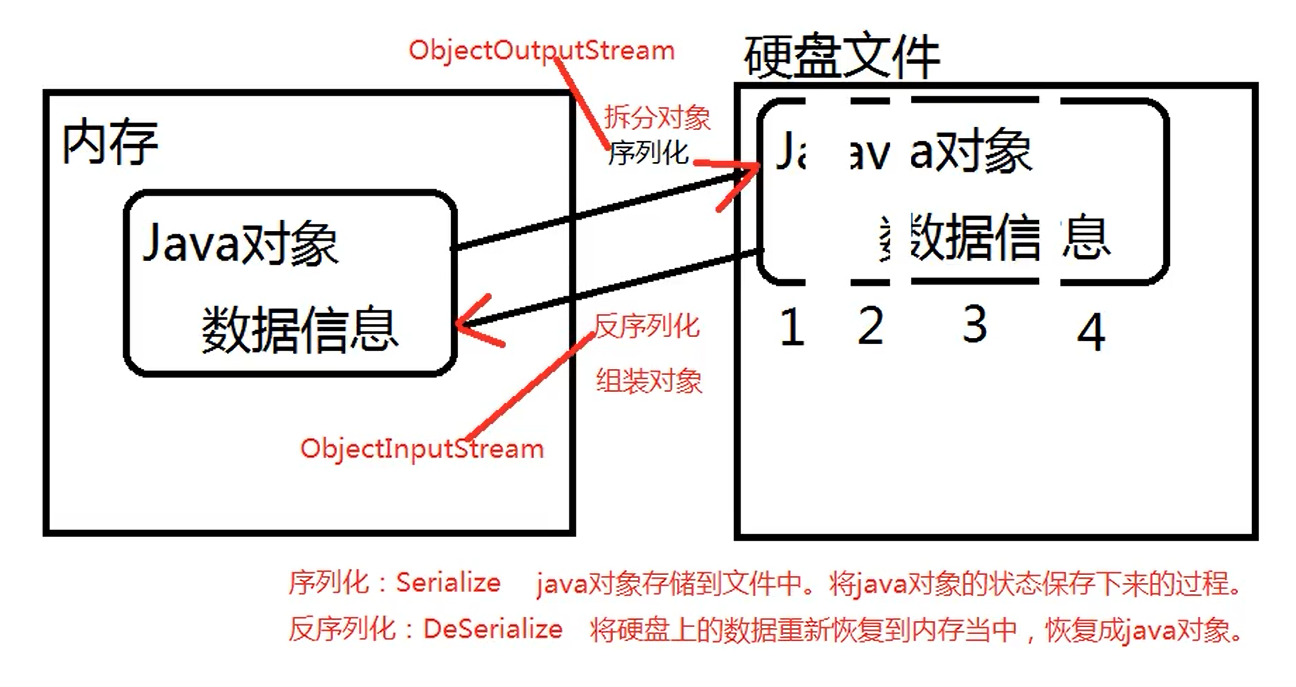
序列化和反序列化
序列化 :
1 2 3 4 5 6 7 8 9 10 11 12 13 14 15 16 17 18 19 20 21 22 23 24 25 26 27 28 29 30 31 32 33 34 35 36 37 38 39 40 41 42 43 44 45 46 47 48 49 50 package IO;import java.io.FileOutputStream;import java.io.ObjectOutputStream;import java.io.Serializable;public class ObjectOutputStreamTest01 public static void main (String[] args) throws Exception Student s = new Student(123 ,"小明" ); ObjectOutputStream oos = new ObjectOutputStream(new FileOutputStream("src/IO/serialize" )); oos.writeObject(s); oos.flush(); oos.close(); } } class Student implements Serializable int id; String name; public Student () } public Student (int id, String name) this .id = id; this .name = name; } @Override public String toString () return "Student{" + "id=" + id + ", name='" + name + '\'' + '}' ; } }
反序列化 :
1 2 3 4 5 6 7 8 9 10 11 12 13 14 package IO;import java.io.FileInputStream;import java.io.ObjectInputStream;public class ObjectInputStreamTest01 public static void main (String[] args) throws Exception ObjectInputStream ois = new ObjectInputStream(new FileInputStream("src/IO/serialize" )); Object obj = ois.readObject(); System.out.println(obj); ois.close(); } }
序列化的时候存多个对象要用List集合:
1 2 3 4 5 6 7 8 9 10 11 12 13 14 15 16 17 18 19 20 21 22 23 24 25 26 27 28 29 30 31 32 33 34 35 36 37 38 39 40 41 42 43 package IO.serialize;import java.io.FileOutputStream;import java.io.ObjectOutputStream;import java.io.Serializable;import java.util.ArrayList;import java.util.List;public class ObjectOutputStreamTest01 public static void main (String[] args) throws Exception ObjectOutputStream oos = new ObjectOutputStream(new FileOutputStream("src/IO/serialize/user" )); List<User> userList = new ArrayList<>(); userList.add(new User(001 ,"小明" )); userList.add(new User(002 ,"小红" )); userList.add(new User(003 ,"小张" )); oos.writeObject(userList); oos.flush(); oos.close(); } } class User implements Serializable int id; String name; public User () } public User (int id, String name) this .id = id; this .name = name; } @Override public String toString () return "User{" + "id=" + id + ", name='" + name + '\'' + '}' ; } }
1 2 3 4 5 6 7 8 9 10 11 12 13 14 15 package IO.serialize;import java.io.FileInputStream;import java.io.ObjectInputStream;import java.util.List;public class ObjectInputStreamTest01 public static void main (String[] args) throws Exception ObjectInputStream ois = new ObjectInputStream(new FileInputStream("src/IO/serialize/user" )); List<User> userList = (List<User>)ois.readObject(); for (User user : userList){ System.out.println(user); } } }
transient关键字 transient关键字标识游离的,不参与序列化操作。
修饰的对象属性不参与序列化。
自动生成序列化版本号缺陷 一旦代码确定之后,就不能进行后续的修改。
只要修改,就会重新编译,此时会生成全新的序列化版本号,这个时候java虚拟机就会认为这是一个全新的类。
所以,一个类凡是实现了Serializable接口,就给该类提供一个固定不变的序列化版本号。
这样即使以后这个类的代码被修改了,但是这个版本号不变,java虚拟机会认为这是同一个类。
IO+Properties IO+Properties是一个非常好的设计理念,以后遇到经常改变的数据,可以单独写到一个文件中,使用程序动态读取。
将来修改此文件的内容的时候,java代码不需要改动,不需要重新编译,服务器也不需要重启。就可以拿到动态的信息。
前提是文件中的格式是:
1 2 3 4 5 key =value key =value key =value key =value key =value
这种配置文件称为属性配置文件。
1 2 3 4 5 6 7 8 9 10 11 12 13 14 15 16 17 18 19 20 21 22 23 24 25 26 27 package IO.IoProperties;import java.io.FileReader;import java.util.Properties;public class IoPropertiesTest01 public static void main (String[] args) throws Exception FileReader reader = new FileReader("src/IO/IoProperties/test" ); Properties pro = new Properties(); pro.load(reader); String username = pro.getProperty("username" ); System.out.println(username); String password = pro.getProperty("password" ); System.out.println(password); } }
多线程 运行一个java文件的时候,会先启动JVM,而JVM就是一个进程。JVM再启动一个主线程调用main方法。同时再启动一个垃圾回收线程负责回收垃圾。
在java语言中:
堆内存和方法区内存共享 。栈内存独立,一个线程一个栈 。
加入启动10个线程,会有10个栈空间,每个栈和每个栈之间互不干扰,这就是多线程并发。
多个CPU表示多个进程并发,4核CUP表示4个进程并发执行。
实现线程的方式 第一种方式 :编写一个类,直接继承java.lang.Thread,重写run方法
1 2 3 4 5 6 7 8 9 10 11 12 13 14 15 16 17 18 19 20 21 22 23 24 25 26 27 28 29 30 31 32 33 34 35 package chapter11.thread;public class ThreadTest01 public static void main (String[] args) MyThread myThread = new MyThread(); myThread.run(); myThread.start(); for (int i=0 ;i<100 ;i++){ System.out.println("主线程==>" +i); } } } class MyThread extends Thread @Override public void run () for (int i=0 ;i<100 ;i++){ System.out.println("分支线程==>" +i); } } }
第二种方式 :编写一个类实现java.lang.Runnable接口
1 2 3 4 5 6 7 8 9 10 11 12 13 14 15 16 17 18 19 20 21 22 23 24 25 26 27 28 29 package chapter11.thread;public class ThreadTest02 public static void main (String[] args) MyRunnable r = new MyRunnable(); Thread t = new Thread(r); t.start(); for (int i=0 ;i<100 ;i++){ System.out.println("主线程==>" +i); } } } class MyRunnable implements Runnable @Override public void run () for (int i=0 ;i<100 ;i++){ System.out.println("分支线程==>" +i); } } }
使用匿名内部类的方式:
匿名内部类就是没有名字的类,new出来的对象。
1 2 3 4 5 6 7 8 9 10 11 12 13 14 15 16 17 18 19 20 21 22 package chapter11.thread;public class ThreadTest03 public static void main (String[] args) Thread t = new Thread(new Runnable() { @Override public void run () for (int i=0 ;i<100 ;i++){ System.out.println("分支线程==>" +i); } } }); t.start(); for (int i=0 ;i<100 ;i++){ System.out.println("主线程==>" +i); } } }
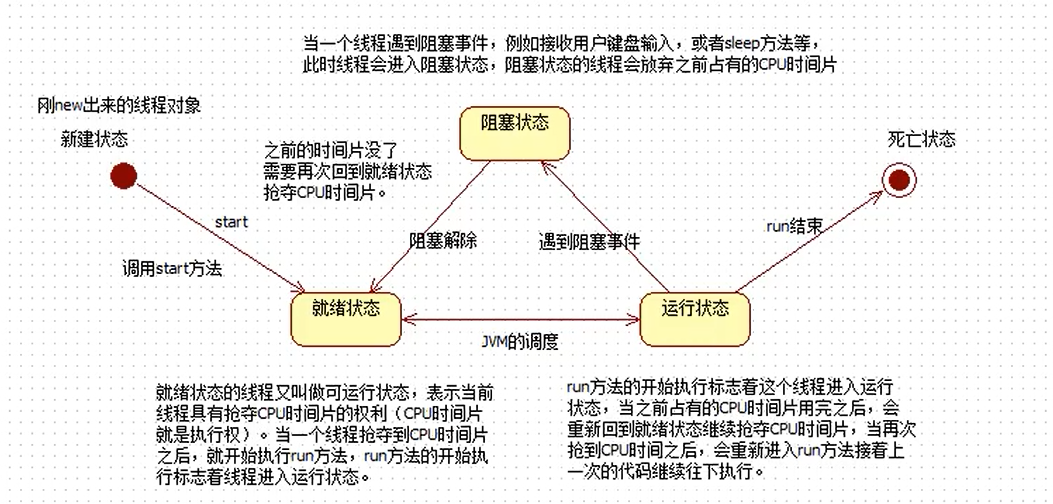
线程生命周期
获取线程的名字 1 String name = 线程对象.getName();
1 2 3 4 5 6 7 8 9 10 11 12 13 14 15 16 17 18 19 20 21 22 23 24 25 26 27 28 29 30 31 32 33 34 package chapter11.thread;public class ThreadTest04 public static void main (String[] args) Thread currentThread = Thread.currentThread(); System.out.println(currentThread.getName()); MyThread2 t = new MyThread2(); System.out.println(t.getName()); t.start(); MyThread2 t2 = new MyThread2(); System.out.println(t2.getName()); t2.start(); for (int i=0 ;i<100 ;i++){ System.out.println("主线程==>" +i); } } } class MyThread2 extends Thread @Override public void run () for (int i=0 ;i<100 ;i++){ Thread currentThread2 = Thread.currentThread(); System.out.println(currentThread2.getName()+"分支线程==>" +i); } } }
线程的睡眠及终止 sleep方法 1 2 3 4 5 6 7 8 9 10 11 12 13 14 15 16 17 18 19 20 21 package chapter11.thread;public class ThreadTest05 public static void main (String[] args) for (int i=0 ;i<10 ;i++){ System.out.println(Thread.currentThread().getName()+"==>" +i); try { Thread.sleep(1000 ); } catch (InterruptedException e) { e.printStackTrace(); } } } }
终止线程的睡眠 1 2 3 4 5 6 7 8 9 10 11 12 13 14 15 16 17 18 19 20 21 22 23 24 25 26 27 28 29 30 31 32 33 34 35 36 37 38 39 package chapter11.thread;public class ThreadTest06 public static void main (String[] args) Thread t = new Thread(new MyRunnable2()); t.setName("t" ); t.start(); try { Thread.sleep(1000 *5 ); } catch (InterruptedException e) { e.printStackTrace(); } t.interrupt(); } } class MyRunnable2 implements Runnable @Override public void run () System.out.println(Thread.currentThread().getName()+"==>begin" ); try { Thread.sleep(1000 *60 *60 *30 ); } catch (InterruptedException e) { e.printStackTrace(); } System.out.println(Thread.currentThread().getName()+"==>end" ); } }
合理终止线程的执行 1 2 3 4 5 6 7 8 9 10 11 12 13 14 15 16 17 18 19 20 21 22 23 24 25 26 27 28 29 30 31 32 33 34 35 36 37 38 39 40 41 42 43 44 45 46 47 48 49 package chapter11.thread;public class ThreadTest08 public static void main (String[] args) MyRunnable4 r = new MyRunnable4(); Thread t = new Thread(r); t.setName("t" ); t.start(); try { Thread.sleep(1000 *5 ); } catch (InterruptedException e) { e.printStackTrace(); } r.run = false ; } } class MyRunnable4 implements Runnable boolean run = true ; @Override public void run () for (int i=0 ;i<10 ;i++){ if (run){ System.out.println("分支线程==>" +i); try { Thread.sleep(1000 ); } catch (InterruptedException e) { e.printStackTrace(); } }else { return ; } } } }
线程调度 常见的线程调度方式
线程调度有关的方法 1 2 3 4 void setPriority (int newPriority) int getPriority () static void yield ()
最低优先级是1,默认优先级是5,最高优先级是10。
1 2 3 4 5 6 7 8 9 10 11 12 13 14 15 16 17 18 19 20 21 22 23 24 25 26 27 28 29 30 31 32 33 34 35 36 37 38 39 package chapter11.thread;public class ThreadTest09 public static void main (String[] args) System.out.println("最高优先级" +Thread.MAX_PRIORITY); System.out.println("默认优先级" +Thread.NORM_PRIORITY); System.out.println("最高优先级" +Thread.MIN_PRIORITY); Thread currentThread = Thread.currentThread(); String name = currentThread.getName(); System.out.println(name+"默认优先级是:" +currentThread.getPriority()); Thread t = new Thread(new MyRunnable5()); t.setName("t" ); t.start(); for (int i=0 ;i<10000 ;i++){ System.out.println(Thread.currentThread().getName()+i); } } } class MyRunnable5 implements Runnable @Override public void run () Thread.currentThread().setPriority(10 ); System.out.println(Thread.currentThread().getName()+"的线程优先级是:" +Thread.currentThread().getPriority()); for (int i=0 ;i<10000 ;i++){ System.out.println(Thread.currentThread().getName()+i); } } }
线程安全 什么时候会存在线程安全问题?
多线程并发
有共享数据
共享数据有修改行为
解决线程安全问题的方法:
线程同步机制 :线程排队执行,不并发。
同步编程模型和异步编程模型 异步编程模型 :线程t1和线程t2,各自执行各的,一个不管一个,也叫多线程并发(效率较高)。
同步编程模型 :线程t1和线程t2,线程t1执行的时候,线程t2必须等待t1执行结束,才能执行。两个线程之间发生了等待关系,线程排队执行。
模拟两个线程对同一个账户取款(非线程同步机制) 1 2 3 4 5 6 7 8 9 10 11 12 13 14 15 16 17 18 19 20 21 22 23 24 25 26 27 28 29 30 31 32 33 34 35 36 37 38 39 40 41 42 43 44 45 46 47 48 49 50 51 52 53 54 55 56 57 58 59 60 61 62 63 64 65 66 67 68 69 70 71 72 73 74 75 76 77 78 79 80 81 82 83 84 85 86 87 88 89 90 package chapter11.threadsafe;public class Test public static void main (String[] args) Account act = new Account("act-001" ,10000 ); Thread t1 = new AccountThread(act); Thread t2 = new AccountThread(act); t1.setName("t1" ); t2.setName("t2" ); t1.start(); t2.start(); } } class Account private String acton; private double balance; public Account () } public Account (String acton, double balance) this .acton = acton; this .balance = balance; } public void setActon (String acton) this .acton = acton; } public String getActon () return acton; } public void setBalance (double balance) this .balance = balance; } public double getBalance () return balance; } public void withdraw (double money) double before = this .getBalance(); double after = before-money; try { Thread.sleep(1000 ); } catch (InterruptedException e) { e.printStackTrace(); } this .setBalance(after); } } class AccountThread extends Thread private Account act; public AccountThread (Account act) this .act = act; } @Override public void run () double money = 5000 ; act.withdraw(money); System.out.println(Thread.currentThread().getName()+"对" +act.getActon()+"取款" +money+"元" +",余额为:" +act.getBalance()); } }
模拟两个线程对同一个账户取款(线程同步机制) 1 2 3 4 5 6 7 8 9 10 11 12 13 14 15 16 17 18 19 20 21 22 23 24 25 26 27 28 29 30 31 32 33 34 35 36 37 38 39 40 41 42 43 44 45 46 47 48 49 50 51 52 53 54 55 56 57 58 59 60 61 62 63 64 65 66 67 68 69 70 71 72 73 74 75 76 77 78 79 80 81 82 83 84 85 86 87 88 89 90 91 92 93 94 95 96 97 98 99 100 101 102 103 104 105 106 107 108 109 110 111 112 package chapter11.threadsafe;public class Test public static void main (String[] args) Account act = new Account("act-002" ,10000 ); Thread t1 = new AccountThread(act); Thread t2 = new AccountThread(act); t1.setName("t1" ); t2.setName("t2" ); t1.start(); t2.start(); } } class Account private String acton; private double balance; public Account () } public Account (String acton, double balance) this .acton = acton; this .balance = balance; } public void setActon (String acton) this .acton = acton; } public String getActon () return acton; } public void setBalance (double balance) this .balance = balance; } public double getBalance () return balance; } public void withdraw (double money) synchronized (this ){ double before = this .getBalance(); double after = before-money; try { Thread.sleep(1000 ); } catch (InterruptedException e) { e.printStackTrace(); } this .setBalance(after); } } } class AccountThread extends Thread private Account act; public AccountThread (Account act) this .act = act; } @Override public void run () double money = 5000 ; act.withdraw(money); System.out.println(Thread.currentThread().getName()+"对" +act.getActon()+"取款" +money+"元" +",余额为:" +act.getBalance()); } }
synchronized java中三大变量:局部变量,实例变量,静态变量。
只有局部变量和常量不涉及线程安全问题,其它都涉及。
synchronized可以出现在实例方法
synchronized可以出现在实例方法上,一定锁的是this,不能是其它对象。
并且代表整个方法体都需要同步,可能会无故扩大同步的范围,导致程序的执行范围降低,所以这种方式不常用。
解决线程安全问题
尽量使用局部变量代替”实例变量”和”静态变量”。
如果必须是实例变量。则考虑创建多个对象,这样实例变量的内存就不共享了。(一个线程对应一个对象,100个线程对应100个对象,对象不共享就没有数据安全问题)。
如果不能使用局部变量,对象也不能创建多个,这个时候只能使用sunchronized,线程同步机制。
synchronizd的三种写法
同步代码块(灵活)
synchronized(线程共享对象){
同步代码块;
}
在实例方法上使用synchronized,表示共享对象一定是this,并且同步代码块是整个方法体。
在静态方法上使用synchronized,表示找类锁,类锁只有一把,就算创建了一百个对象,类锁也只有一把。
死锁 1 2 3 4 5 6 7 8 9 10 11 12 13 14 15 16 17 18 19 20 21 22 23 24 25 26 27 28 29 30 31 32 33 34 35 36 37 38 39 40 41 42 43 44 45 46 47 48 49 50 51 52 53 54 55 56 57 58 59 60 61 62 63 package chapter11.deadlock;public class DeadLock public static void main (String[] args) Object o1 = new Object(); Object o2 = new Object(); Thread t1 = new MyThread1(o1,o2); Thread t2 = new MyThread2(o1,o2); t1.start(); t2.start(); } } class MyThread1 extends Thread Object o1; Object o2; public MyThread1 (Object o1,Object o2) this .o1 = o1; this .o2 = o2; } @Override public void run () synchronized (o1){ try { Thread.sleep(1000 ); } catch (InterruptedException e) { e.printStackTrace(); } synchronized (o2){ } } } } class MyThread2 extends Thread Object o1; Object o2; public MyThread2 (Object o1,Object o2) this .o1 = o1; this .o2 = o2; } @Override public void run () synchronized (o2){ try { Thread.sleep(1000 ); } catch (InterruptedException e) { e.printStackTrace(); } synchronized (o1){ } } } }
守护线程 java中线程分为两大类:用户线程和守护线程 (后台线程)。
垃圾回收线程就是一个守护线程。
守护线程的特点 :一般守护线程是一个死循环,所有用户线程只要结束,守护线程自动结束。
主线程main方法是一个用户线程。
1 2 3 4 5 6 7 8 9 10 11 12 13 14 15 16 17 18 19 20 21 22 23 24 25 26 27 28 29 30 31 32 33 34 35 36 37 38 39 40 package chapter11.thread;public class ThreadTest10 public static void main (String[] args) BackDataThread back = new BackDataThread(); back.setName("守护线程" ); back.setDaemon(true ); back.start(); for (int i=0 ;i<10 ;i++){ System.out.println("主线程==>" +i); try { Thread.sleep(1000 *1 ); } catch (InterruptedException e) { e.printStackTrace(); } } } } class BackDataThread extends Thread @Override public void run () int i = 0 ; while (true ){ System.out.println(Thread.currentThread().getName()+"==>" +(++i)); try { Thread.sleep(1000 *1 ); } catch (InterruptedException e) { e.printStackTrace(); } } } }
定时器 定时器的作用:间隔特定的时间,执行特定的程序。
实现线程的第一种方式:sleep
实现线程的第二种方式:Timer
1 2 3 4 5 6 7 8 9 10 11 12 13 14 15 16 17 18 19 20 21 22 23 24 25 26 27 28 29 30 31 32 33 34 35 36 package chapter11.thread;import java.text.SimpleDateFormat;import java.util.Date;import java.util.Timer;import java.util.TimerTask;public class TimerTest01 public static void main (String[] args) throws Exception Timer timer = new Timer(); SimpleDateFormat sdf = new SimpleDateFormat("yyyy-MM-dd HH:mm:ss" ); Date firstTime = sdf.parse("2020-09-17 12:36:00" ); timer.schedule(new LogTimerTask(),firstTime,1000 *10 ); } } class LogTimerTask extends TimerTask @Override public void run () SimpleDateFormat sdf = new SimpleDateFormat("yyyy-MM-dd HH:mm:ss" ); String strTime = sdf.format(new Date()); System.out.println(strTime+":成功完成数据备份" ); } }
wait和notify方法 wait和notiy方法是Object类自带的。
wait()方法:让o对象上活动的线程进入等待状态,无期限等待,直到被唤醒。
notify()方法:唤醒正在o对象上等待的线程。
生产者和消费者模式 :
代码实现:
1 2 3 4 5 6 7 8 9 10 11 12 13 14 15 16 17 18 19 20 21 22 23 24 25 26 27 28 29 30 31 32 33 34 35 36 37 38 39 40 41 42 43 44 45 46 47 48 49 50 51 52 53 54 55 56 57 58 59 60 61 62 63 64 65 66 67 68 69 70 71 72 73 74 75 76 77 78 79 80 81 82 83 84 85 86 87 88 89 90 91 92 93 94 package chapter11.thread;import java.util.ArrayList;import java.util.List;public class ThreadTest11 public static void main (String[] args) List list = new ArrayList(); Thread t1 = new Thread(new Producer(list)); Thread t2 = new Thread(new Consumer(list)); t1.setName("生产者线程" ); t2.setName("消费者线程" ); t1.start(); t2.start(); } } class Producer implements Runnable private List list; public Producer (List list) this .list = list; } @Override public void run () while (true ){ synchronized (list){ if (list.size()>0 ){ try { list.wait(); } catch (InterruptedException e) { e.printStackTrace(); } } Object obj = new Object(); list.add(obj); System.out.println(Thread.currentThread().getName()+"==>" +obj); list.notify(); } } } } class Consumer implements Runnable private List list; public Consumer (List list) this .list = list; } @Override public void run () while (true ){ synchronized (list){ if (list.size() == 0 ){ try { list.wait(); } catch (InterruptedException e) { e.printStackTrace(); } } Object obj = list.remove(0 ); System.out.println(Thread.currentThread().getName()+"==>" +obj); list.notify(); } } } }
反射机制 反射机制可以操纵字节码文件,可以读和修改字节码文件。
反射机制相关重要的类:
1 2 3 4 java.lang.Class: 代表整个字节码,代表一个类型,代表整个类 java.lang.reflect.Method: 代表字节码中的方法字节码,代表类中的方法 java.lang.reflect.Constructor: 代表字节码中的构造方法字节码,代表类的构造方法 java.lang.reflect.Field: 代码字节码中的属性字节码。代表类中的成员变量(静态变量+实例变量)
java中获取Class的三种方式 1 2 3 4 5 6 7 8 9 10 11 12 13 14 15 16 17 18 19 20 21 22 23 24 25 26 27 28 29 30 31 32 33 34 35 36 37 38 39 40 41 42 43 44 45 package reflect;import java.util.Date;public class ReflectTest01 public static void main (String[] args) Class c1 = null ; Class c2 = null ; Class c3 = null ; Class c4 = null ; try { c1 = Class.forName("java.lang.String" ); c2 = Class.forName("java.util.Date" ); c3 = Class.forName("java.lang.Integer" ); c4 = Class.forName("java.lang.System" ); } catch (ClassNotFoundException e) { e.printStackTrace(); } String s = "abc" ; Class x = s.getClass(); System.out.println(x); System.out.println(c1 == x); Date time = new Date(); Class y= time.getClass(); System.out.println(c2 == y); Class z = String.class ; Class k = Date.class ; System.out.println(x == z); } }
通过属性文件灵活实例化对象
1 2 3 4 5 6 7 8 9 10 11 12 13 14 15 16 17 18 19 20 21 22 23 24 25 package reflect;import java.io.FileReader;import java.io.InputStream;import java.util.Properties;public class ReflectTest03 public static void main (String[] args) throws Exception InputStream reader = Thread.currentThread().getContextClassLoader() .getResourceAsStream("reflect/classinfo.properties" ); Properties pro = new Properties(); pro.load(reader); reader.close(); String className = pro.getProperty("className" ); System.out.println(className); Class c = Class.forName(className); Object obj = c.newInstance(); System.out.println(obj); } }
Class.forName()方法 1 2 3 4 5 6 7 8 9 10 11 12 13 14 15 16 17 18 19 package reflect;public class ReflectTest04 public static void main (String[] args) try { Class.forName("reflect.MyClass" ); } catch (ClassNotFoundException e) { e.printStackTrace(); } } } class MyClass static { System.out.println("MyClass类的静态代码块执行" ); } }
获取文件的根路径 1 2 3 4 5 6 7 8 9 10 package reflect;public class AbsolutePath public static void main (String[] args) String path = Thread.currentThread().getContextClassLoader() .getResource("reflect/classinfo.properties" ).getPath(); System.out.println(path); } }
以后写IO流的时候都以此方式获取文件路径。
资源绑定器 1 2 3 4 5 6 7 8 9 10 11 12 13 14 package reflect;import java.util.ResourceBundle;public class ResourceBundleTest01 public static void main (String[] args) ResourceBundle bundle = ResourceBundle.getBundle("reflect/classinfo" ); String className = bundle.getString("className" ); System.out.println(className); } }
类加载器 java有三个类加载器:
启动类加载器:rt.jar
扩展类加载器:ext/*.jar
应用类加载器:classPath
通过反射机制访问对象属性 1 2 3 4 5 6 7 8 9 10 11 12 13 14 15 16 17 18 19 20 21 22 23 24 25 26 27 28 29 package reflect;import java.lang.reflect.Field;public class ReflectTest06 public static void main (String[] args) throws Exception Class userClass = Class.forName("reflect.user.User" ); Object obj = userClass.newInstance(); Field nameField = userClass.getDeclaredField("name" ); nameField.set(obj,"小明" ); System.out.println(nameField.get(obj)); Field numberField = userClass.getDeclaredField("number" ); numberField.setAccessible(true ); numberField.set(obj,100 ); System.out.println(numberField.get(obj)); } }
反射Method 1 2 3 4 5 6 7 8 9 10 11 12 13 14 15 16 17 18 19 20 21 22 23 24 25 26 27 28 29 30 31 32 package reflect;import java.lang.reflect.Method;import java.lang.reflect.Modifier;public class ReflectTest07 public static void main (String[] args) throws Exception Class userServiceClass = Class.forName("reflect.user.UserService" ); Method[] methods = userServiceClass.getDeclaredMethods(); System.out.println(methods.length); for (Method method : methods){ System.out.println(Modifier.toString(method.getModifiers())); System.out.println(method.getReturnType()); System.out.println(method.getName()); Class[] parameterTypes = method.getParameterTypes(); for (Class parameterType : parameterTypes){ System.out.println(parameterType.getSimpleName()); } } } }
反射机制调用方法 1 2 3 4 5 6 7 8 9 10 11 12 13 14 15 16 17 18 19 20 21 22 23 24 25 package reflect;import java.lang.reflect.Method;public class ReflectTest08 public static void main (String[] args) throws Exception Class userServiceClass = Class.forName("reflect.user.UserService" ); Object obj = userServiceClass.newInstance(); Method loginMethod = userServiceClass.getDeclaredMethod("login" , String.class , String .class ) ; Object retValue = loginMethod.invoke(obj,"admin" ,"123" ); System.out.println(retValue); } }
反射机制调用Constructor 1 2 3 4 5 6 7 8 9 10 11 12 13 14 15 16 17 18 19 20 package reflect;import java.lang.reflect.Constructor;public class ReflectTest09 public static void main (String[] args) throws Exception Class c = Class.forName("reflect.user.Person" ); Object obj = c.newInstance(); Constructor con = c.getDeclaredConstructor(int .class ,String .class ,boolean .class ,String .class ) ; Object newObj = con.newInstance(1800231 ,"小明" ,true ,"云南大理" ); System.out.println(newObj); } }
获取父类和父接口 1 2 3 4 5 6 7 8 9 10 11 12 13 14 15 16 17 18 package reflect;public class ReflectTest10 public static void main (String[] args) throws Exception Class stringClass = Class.forName("java.lang.String" ); Class superClass = stringClass.getSuperclass(); System.out.println(superClass.getSimpleName()); Class[] strInterfaces = stringClass.getInterfaces(); for (Class in : strInterfaces){ System.out.println(in.getName()); } } }
注解 注解的格式是:@注解类型名
1 2 3 4 注解的语法格式: [修饰符列表] @interface 注解类型名{ }
注解可以出现在类上,属性上、方法上、变量上等…
注解还可以出现在注解类型上。
jdk内置的注解
Deprecated:用@Deprecated注释的程序元素,是表示被弃用的。
Override:表示一个方法声明打算重写超类中的另一个方法声明。
元注解: 用来标注”注解”的”注解”,成为元注解。
常见的元注解有Target,Retention
Target注解:这是一个元注解,用来标注”注解类型”的”注解”,”Target”注解用来标注”被标注的注解”可以出现在哪些位置上。
@Target(ElementType.METHOD):表示”被标注的注解”只能出现在方法上。
@Target(value = {CONSTRUCTOR,FIELD,LOCAL_VARIABLE,METHOD,PACKAGE,MODULE})表示注解可以出现在构造方法,字段,局部变量,方法,类....上。
Retention注解:这是一个元注解,用来标注”注解类型”的”注解”,Rentention注解用来标注”被标注的注解”最终保存在哪里。
@Retention(RetentionPolicy.SOURCE):表示该注解只保留在java源文件中。
@Retention(RetentionPolicy.CLASS):表示该注解被保留在class文件中。
@Retention(RetentionPolicy.RUNTIME):表示该注解被保存在class文件中,并在运行时提示。
通过反射机制读取注解 MyAnnotation.java
1 2 3 4 5 6 7 8 9 10 11 12 13 14 15 16 package chapter12.annotation2;import java.lang.annotation.ElementType;import java.lang.annotation.Retention;import java.lang.annotation.RetentionPolicy;import java.lang.annotation.Target;@Target ({ElementType.TYPE,ElementType.METHOD,ElementType.FIELD})@Retention (RetentionPolicy.RUNTIME)public @interface MyAnnotation { String value () default "小灰灰" ; }
AnnotationTest01.java
1 2 3 4 5 6 7 8 9 10 11 12 13 package chapter12.annotation2;@MyAnnotation public class AnnotationTest01 public static void main (String[] args) int i; } public void doSome () } }
ReflectAnnotationTest.java
1 2 3 4 5 6 7 8 9 10 11 12 13 14 15 16 17 package chapter12.annotation2;public class ReflectAnnotationTest public static void main (String[] args) throws Exception Class c = Class.forName("chapter12.annotation2.AnnotationTest01" ); System.out.println(c.isAnnotationPresent(MyAnnotation.class )) ; if (c.isAnnotationPresent(MyAnnotation.class )) { MyAnnotation myAnnotation = (MyAnnotation)c.getAnnotation(MyAnnotation.class ) ; System.out.println("类上面的注解对象" +myAnnotation); System.out.println(myAnnotation.value()); } } }